Todays Project - What did you do today?
Amongst other things such as helping my daughter move house and helping a mate change the clutch in his Land Rover (as seen in the background below) I did a little carpentry. Probably not going to get as many oohs and aahs as Greg's desk....
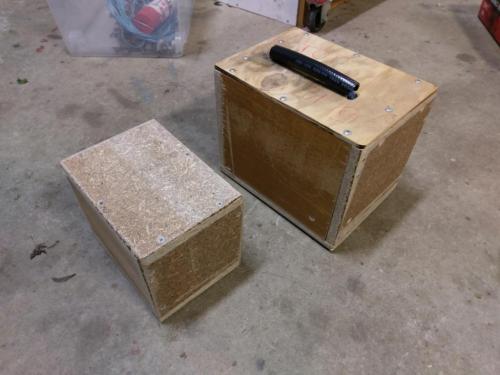
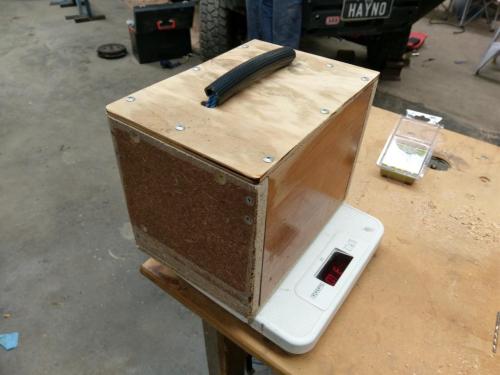


Cunningly concealed within these masterpieces are a dividing head along with the tailstock and sundries, ready to make their way across Australia. That's 31kg on the scales, about 70lb in the old money. The other box weighed in at 10kg, it has, along with the tailstock, the dividing plates, fingers and crank, the chuck jaws and whatever else I could remove from the thing to get the weight of the main box down, still weighs as much as a 9-year-old child. The rope handle is through the spindle so no, it's not going to pull the lid off the box!
Lathe (n); a machine tool used in the production of milling machine components.

Milling Machine (n); a machine tool used in the production of lathe components.
Reply
Thanks given by:
oohh, aahh Big Grin
Hunting American dentists since 2015.
Reply
Thanks given by:
aahh, oohh
Free advice is worth exactly what you payed for it.
Greg
Reply
Thanks given by:
Yours is much better than Greg's desk. Yours doesn't have those red stripes down the middle. Yours is good enough to put varnish on and not paint! Rotfl
Reply
Thanks given by:
Good job on the crating.   Smiley-signs107   I bought a Baldor 8" bench/pedestal grinder off Boston's Craig's List and paid an extra $100.00 for shipping (it was worth it given the price & condition of the grinder).  The seller took it to UPS and they boxed it standing on end with an inadequate amount of bubble pack wrapped around the grinder.  Fortunately not too much damage, primarily the bracket for the tool rest.  It took some h#ll raising with UPS to pay for the tool rest and I in effect was refunded the shipping charge.   Big Grin
Reply
Thanks given by:
I Like shiny - very nice Thumbsup   Smiley-signs107 
Smiley-eatdrink004 
DaveH
 a child of the 60's and 50's and a bit of the 40's Smile
Reply
Thanks given by:
I had a hitch adapter to repair for myself and one for a client so I thought I would knock them out.

I have repaired about a dozen hitches and ball mounts in this manner now over the past 10 or so years and they have held up extremely well although they are a bit time consuming to do so if you have to take them to a shop to have done, it may not be cost effective.  It is a common issue to have the hitch pin holes elongate over time (mostly miles).

Hitch pin clearance in elongated pin hole.
[Image: 148kcol.jpg]

Some 1" 8620 I had on the shelf.
[Image: htd3ba.jpg]

I used a 1" diameter sleeve with .625" hole drilled to accept a standard hitch pin, actually slightly bored out a few thousandths more.  I then chamfered the sleeve to accept a weld bead yet be flush with the surrounding stinger.  I then bored the elongated hole out to .998" so it would be an interference fit into the stinger before welding using some 309L stainless steel TIG rod.  I like the 309 due to the slightly different composition material but also because it gives a slightly better elongation characteristics that seem to hold up better to the shock loads present on the hitches when in use.

Machining the sleeve as well as the side bushings/reducers for the receiver part of the hitch.  I have the steel chucked up in my new 5C collet chuck on the lathe.
[Image: vyplyc.jpg]

Picture of the sleeve pressed in and TIG welded.
[Image: 167p1sk.jpg]

Couple pictures of the first pass around the reducer.
[Image: eju5fs.jpg]

[Image: 2d7a4h4.jpg]

Couple pictures of the cover pass with a slight weave to increase the size of the fillet.
[Image: 2vnnjvl.jpg]

[Image: 2s8gruq.jpg]

All in all a pretty straightforward repair but it give a lot more surface area for the hitch pin to spread the load over.  

Mike.

Reply
Thanks given by:
I helped my son install his new gauge cluster in his 2002 GM 2500HD Duramax Friday night.  My wife and I bought him a couple of Auto Meter gauges for Christmas (Boost and Pyrometer) and he bought a PPE overhead console mounting block.  The mounting block has been backordered for the past several months but it finally showed up a couple of weeks ago.

PPE gauge pod and Auto Meter gauges with tape to avoid scratching during test fit and assembly.
[Image: 1z3p18w.jpg]

Gauge pod test fit into overhead console after removing the console from the truck.
[Image: jgpbir.jpg]

We had to machine a couple of mounting tabs.  I stood by and let my son get some hands on time on the mill.  He hasn't had the time to get used to our new mill much lately so I figured now was a good time since it was for his truck.
[Image: 2rxfia1.jpg]

Mounting brackets/tabs done.
[Image: fc5fcy.jpg]

On the one side a small notch had to be cut to clear the mounting bracket of the gauge.  Nothing a .5" end mill wouldn't take care of.
[Image: mc5irq.jpg]

Mounting tab in place clearing the bulge in the gauge mounting hardware.
[Image: i1y45k.jpg]

Backside of gauge cluster completed and ready to run wires and tube from engine bay to the overhead console.
[Image: 2njyolt.jpg]

Next I had my son knock out a small bung which was threaded to 1/8 NPT for the boost line.  Figured he may as well get some time on the lathe as well.
[Image: 15ri45w.jpg]

Pulled the intake tube from the intercooler, drilled and welded the bung on and reinstalled the intake tube before running the boost line.
[Image: uqyqx.jpg]

And project completed.
[Image: 9kug04.jpg]

In my 06 Duramax I mounted mine on the driver's side "A" pillar but my son didn't want his there and wanted them in the blank space in his overhead console.  All in all a pretty good looking gauge and pod setup if you ask me.

Mike.

Reply
Thanks given by:
Another kind of "odd" project, this one for my lovely wife.  

While we were in Texas a couple of months ago attending an RV/Jeep rally one of the guys there had cut and trimmed down some tree limbs/branches for some of the ladies for walking sticks.  He gave one to my wife while we were there.

When we got home my wife commented on how she would like to start collecting the pins from National Parks and putting them on her walking stick like my son did over the period of his youth.  I decided to add my touch to the stick prior to putting the first pin on it, Big Bend National Park pin.

I cut it down to better suit her height.  I then ran a DA over it with some 180 grit sandpaper on it to smooth out the bumps and rid it of some of the splinters before adding a couple of coats of MinWax English Chestnut stain (just because I had a pint on hand for something or other).  Once the stain was to the desired darkness I added a couple of coats of automotive clearcoat for durability.

Here is the walking stick hanging from my lift drying after the second coat of clear.
[Image: 2mra34j.jpg]

I then had to add some machining touches to it.  I dug through my scrap aluminum and found a slug to machine a top cap from.
[Image: ml2ip1.jpg]

Cutting down the OD.
[Image: whgygo.jpg]

I made a radius cutting tool and turned a radius on the top.
[Image: 2e4i24n.jpg]

Ready to flip around and hog out the underside to fit over the top of the walking stick.
[Image: 14v4kk1.jpg]

Underside machined and ready for installation.
[Image: 20kzn9x.jpg]

Outside completed and cleaned.
[Image: 2hociaf.jpg]

Bottom end completed as well and both installed.  I machined them so they are an interference fit as well as gluing them on and screwing them on.
[Image: e5ocp1.jpg]

[Image: 10x6m8g.jpg]

The bottom end is also recessed about .170" so I need to locate some rubber, poly or UHMW to machine and install for the foot.  Then all that is left is to get some leather or parachute cord and make a handle and I want to wrap the area just below the top part for her to hold onto.

Completed walking stick.

Wrapped some paracord around the top, just below the top cap and then made a wrist strap.  
[Image: vhdgte.jpg]

I also knocked out a meat hook, or meat turning apparatus.  When we went to the same RV/Jeep rally in Texas one of the guys had a cool looking meat hook that he was using to turn his steaks.  It was a piece of stainless steel rod with a hook on the end, but it then had an antler for the handle.  Since I don't work in antlers, or even wood for that matter, I opted to make me one from some 304 stainless steel, handle and all.

Here is the finished product.
[Image: ibyhxf.jpg]

Close up of the handle itself.
[Image: 2zjj5uq.jpg]

I have used it a few times now and it works fantastic.

Mike.

Reply
Thanks given by:
(06-24-2016, 04:03 PM)zmotorsports Wrote: [Image: 2d7a4h4.jpg]

Couple pictures of the cover pass with a slight weave to increase the size of the fillet.
[Image: 2vnnjvl.jpg]

[Image: 2s8gruq.jpg]

Nice job Mike. I used to gas weld a lot of 4130 tube structures that had bushings in them, but TIG makes it SO much prettier.

Tom
[Image: TomsTechLogo-Profile.png]
Reply
Thanks given by: zmotorsports


Users browsing this thread: 54 Guest(s)