Posts: 3,003
Threads: 51
Joined: Apr 2012
Location: Ontario
One of the very few disadvantage to rural life is the hour drive to the city when you need stock. If the foundry was up and running I could cast some brass rod but its not so here was todays alternative. Was given four of these bushings years ago, about 7 1/4 tall and 7 1/2 dia with a 1 5/16 wall. Saw out a slab.
![[Image: IMG_0987.jpg]](https://lh5.googleusercontent.com/-9o5QZgbpHko/UtCc87LFNII/AAAAAAAAB2A/IKeLdUw3ZmI/s1280/IMG_0987.jpg)
And make it round.
![[Image: IMG_0988.jpg]](https://lh5.googleusercontent.com/-vN5Yzny4yzg/UtCc9iKuW-I/AAAAAAAAB2E/gLx9t9jmJ8g/s1280/IMG_0988.jpg)
Free advice is worth exactly what you payed for it.
Greg
Posts: 2,685
Threads: 29
Joined: Feb 2012
Location: Nova Scotia, Canada
Hey Greg, if the material is in inventory, your golden!
Busy Bee 12-36 lathe, Busy Bee Mill drill, Busy Bee 4x6 bandsaw, Homemade 9x17 bandsaw, Ad infinitum.
Posts: 2,344
Threads: 53
Joined: Feb 2012
Location: Spencer MA USA
The following 3 users Like PixMan's post:
Mayhem (01-18-2014), EdK (01-19-2014), wrustle (01-20-2014)
01-18-2014, 07:47 PM
(This post was last modified: 01-18-2014, 07:52 PM by PixMan.)
Today's project for me was to make yet another axle out of 316 stainless steel for my friend Neil's (expat here) custom motorcycle builds. He brought over two lengths of 1-3/8" diameter stock, just enough in one to make the axle and a spacer bushing. The shorter piece will be made into more spacers later.
The finished diameter of the longest part of the axle was 15mm, so we had to turn 10.708" (272mm) of the length down from 1.375 to 0.590". That took almost an hour with multiple cuts ranging from 2mm to 1mm per side (.156" to .078" on diameter.) Holding in the 3-jaw chuck on one end and with a "CNC style" live center in the other, we did have some trouble with chatter on heavier cuts so we had to lessen the depth of cut and increase the feed rate to quell the vibrations. Neil did take a short video of it with his phone once we were getting good chip control and no chatter. At 1200 rpm and .0106" per rev feed, it went pretty good and we had mostly short broken chips dropping into the chip pan.
I did turn close to finish size, but we were getting about .0018" taper, and it wasn't a linear progression along the length. Ultimately I did have to file and polish the last 0.001" off to get it right. The end was turned to 14mm for the thread. after turning it around we faced, drilled and turned the spacer to be made out of the chucked end of the shaft. We "just made it" with not drilling into the head of the axle. When I cutoff the spacer the tip of the drilled hole from the spacer just disappeared. Wow, either good planning of sh*t luck, or both. I couldn't thread it today because I'd returned the 70 tooth gear I borrowed after having it for a week. The blanks I'd sent out were due in this week but hadn't shown up yet. Of course they were in the mail shortly after I returned home. ;)
Here's the axle, needing the thread, the milled hex and drilled cross holes in threaded area. And the spacer that needs a finished bore and length:
![[Image: IMG_20140118_182150666_zpsd9axmnm6.jpg]](http://img.photobucket.com/albums/v466/kenm10759/Dads%20shop/IMG_20140118_182150666_zpsd9axmnm6.jpg)
And here's my new 70, 35 and 30 tooth 1.75 module gears, and after I find a 6mm broach I can afford they're ready to go for metric threading of nearly any pitch:
![[Image: IMG_20140118_182033581_zpsjgfcp99k.jpg]](http://img.photobucket.com/albums/v466/kenm10759/Dads%20shop/IMG_20140118_182033581_zpsjgfcp99k.jpg)
Posts: 4,683
Threads: 93
Joined: Feb 2012
Location: Perth, Australia
The following 2 users Like Mayhem's post:
stevec (01-19-2014), EdK (01-19-2014)
01-19-2014, 03:26 AM
(This post was last modified: 01-19-2014, 03:27 AM by Mayhem.)
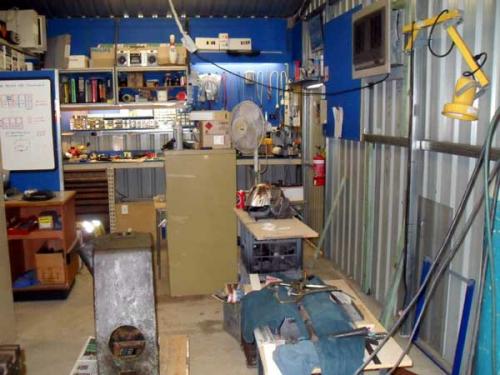
I've been slowly making some room in my workshop to accommodate my lathe, mill, shaper and drill presses. My workshop is 12.2m x 7.6m x 3.0m (40' x 25' x 9'10") and when I built it I partitioned off one of the bays, giving me a space 7.6m x 4m (25' x 13'4"). Initially this space was used to store and repair sound and lighting equipment for an after hours business I was a co-owner of.
Now that I am no longer involved in that business, I have decided this will become my machine area. Welders, grinders and the like will be back in the rest of the shop as they always have/had been.
I've put some framework in place so that I can sheet the walls in chipboard. The last thing I want is metal chips filling the voids in the wall sheets and rusting them out. My brother-in-law has just fitted a s/h evaporative A/C unit that he gifted me, which I plumbed in yesterday.
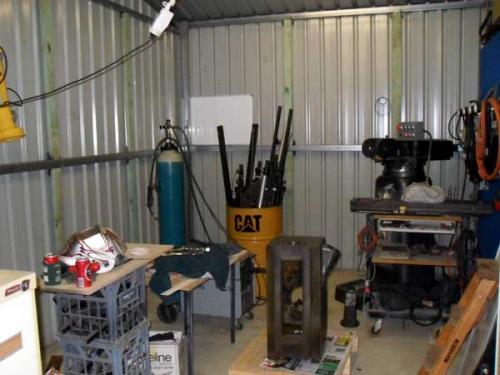
Back of the workshop looking toward my bench. There is a door between the bench and the fire extinguisher, and the lathe will live along the wall on the right. The outboard end of the spindle will be about 1m (3'3") from the door. Behind the whiteboard on the left is my computer desk.

I've decided to move the mill from the corner on the right to the corner on the left, as when looking at the equipment footprints on paper/CAD it will give me more room.

There is still a lot of clutter and stuff to be moved out. I will free up a lot of space just by putting the mill is back together! Once finished, I'll post in the "let's see your workshop thread".
Hunting American dentists since 2015.
Posts: 2,344
Threads: 53
Joined: Feb 2012
Location: Spencer MA USA
The following 1 user Likes PixMan's post:
wrustle (01-20-2014)
Those look like bare steel walls in your shop Darren. Given the temps there lately the walls must get hot enough to use the place as a heat treat furnace. ;)
That's a nice space, and with the organization done you will have plenty of room. I'm pretty much topped out where I am, and I still want to add the CNC lathe, a MIG/TIG welder and a few more things. Eventually I also have to empty out my dad's standalone woodworking shed. You seem to have enough total area to have everything in one shop.
Wait a minute. What am I saying? No shop is ever big enough!
Posts: 4,683
Threads: 93
Joined: Feb 2012
Location: Perth, Australia
Yes, that is the standard Australian 'tin shed'. It can get hot on some days but the high roof helps. A fan moving the air around is also a big help. I'm thinking about putting some insulation behind the chipboard but I'll see how that goes.
No - no shop is ever big enough!
Hunting American dentists since 2015.
Posts: 3,798
Threads: 184
Joined: Jun 2012
Location: Farmington Hills, Michigan
Darren,
It looks like you are facing the same type of job that I am, having to work on the structure when it's full of stuff. I need to sheet in the ceiling of my shop, but it's going to be a real PIA with all of the machinery and shelving in place. I would definite recommend insulating before you cover the walls. It won't take much more effort and it'll definitely pay off over time in reduced heating and cooling costs (or in your case cooling and heating costs)  .
And yes, no shop is ever big enough.
Tom
Posts: 642
Threads: 14
Joined: Oct 2013
Location: East Sussex, UK
Cheer up Tom, it could be worse. At my last place I decided to line the concrete floor with 18 mm OSB to make a nicer surface to work on, and ended up having to tilt lift my J&S 1300 EUIR cylindrical grinder one end at a time single handed to lay it. Not sure what it weighs but something of the order of two tons and big and awkward. At least here I got the floor down first !
Andrew
Andrew Mawson, proud to be a member of MetalworkingFun Forum since Oct 2013.
Posts: 2,344
Threads: 53
Joined: Feb 2012
Location: Spencer MA USA
01-19-2014, 04:18 PM
(This post was last modified: 01-20-2014, 09:54 AM by PixMan.)
Today's project: Fix the compound slide on my Victor 1640 lathe.
Yesterday when Neil & I were making the motorcycle parts, the compound seized on me, tighter than a bug's ass. When I got the the shop I pulled out the machine manual and reviewed the assembly. Clear as mud but better than nothing. What a PITA to tear it down! Because the threads were seized and you have to unscrew the 3/4-8 Acme screw to get it apart, lots of solvents and lubricants were required but I did get it done. Here it is all disassembled:
![[Image: IMG_2103-r_zpsd2887022.jpg]](http://img.photobucket.com/albums/v466/kenm10759/Dads%20shop/IMG_2103-r_zpsd2887022.jpg)
Well it seems something about the bronze nut was to blame, and upon taking it apart it became clear that I wasn't the first to get into it and rip it apart. I put copper in the jaws of my "manly" bench vise and clamped it firmly. The screw itself is still in great shape, but the split bronze nut is distorted. How it got that way I have no clue. I tried all sort of bending it open and clamping it closed to find the loosest position, but there's no means to keep it open mechanically. A set screw will close it though, when fully assembled. Here's a somewhat blurry photo of the screw and nut.
![[Image: IMG_2102-r_zpsc58b863e.jpg]](http://img.photobucket.com/albums/v466/kenm10759/Dads%20shop/IMG_2102-r_zpsc58b863e.jpg)
Finding no position of free and easy engagement and having no 3/4-8 Acme tap on hand, I resorted to making the tip of the screw act as a tap of sorts. A few minutes with a 1/8" cutter in a Dremel, and this is what the result looked like. It worked "OK", just a little cutting action. That's good because I'm in no position to be buying a new replacement nut and I can't make one with no functioning compound slide on the machine.
![[Image: IMG_2100-r_zpsbe2d5136.jpg]](http://img.photobucket.com/albums/v466/kenm10759/Dads%20shop/IMG_2100-r_zpsbe2d5136.jpg)
With the screw now free enough to actually move in the nut with one hand (still quite snug though), I began reassembly. I cleaned everything "surgically clean" and gooped it all up with Mobil Vactra 2 way lube as I put it back together.
![[Image: IMG_2104-r_zps7c4543c8.jpg]](http://img.photobucket.com/albums/v466/kenm10759/Dads%20shop/IMG_2104-r_zps7c4543c8.jpg)
It'll have to do as is for now, but at least I can use the machine to make a new piece. Stupid me, I forgot to take measurements abd make a drawing before I reassembled it, so I guess it'll be coming apart again before I can make one. 
On the way home, I stopped to take a photo of these potential dinners walking around. They frequently are seen on this one backroad, as many as 15 or 16 at times. The one closest is a tom that probably weighs close to 27 pounds. The others in the photo are a little smaller, but yesterday I spotted two other toms that were easily in the 30 pound range. Much bigger than any of these.
![[Image: IMG_2097-r_zpsbaa05a04.jpg]](http://img.photobucket.com/albums/v466/kenm10759/Dads%20shop/IMG_2097-r_zpsbaa05a04.jpg)
Posts: 3,003
Threads: 51
Joined: Apr 2012
Location: Ontario
Just had 7 of them outside the shop, they come and eat the crab apples that fall off the tree.
![[Image: IMG_0981.jpg]](https://lh6.googleusercontent.com/-vxyB6dvKdRE/UtxDISFMp-I/AAAAAAAAB2g/zN2cxA-Jy0Y/s1280/IMG_0981.jpg)
Free advice is worth exactly what you payed for it.
Greg
|
![[Image: IMG_0987.jpg]](https://lh5.googleusercontent.com/-9o5QZgbpHko/UtCc87LFNII/AAAAAAAAB2A/IKeLdUw3ZmI/s1280/IMG_0987.jpg)
![[Image: IMG_0988.jpg]](https://lh5.googleusercontent.com/-vN5Yzny4yzg/UtCc9iKuW-I/AAAAAAAAB2E/gLx9t9jmJ8g/s1280/IMG_0988.jpg)
![[Image: IMG_0987.jpg]](https://lh5.googleusercontent.com/-9o5QZgbpHko/UtCc87LFNII/AAAAAAAAB2A/IKeLdUw3ZmI/s1280/IMG_0987.jpg)
![[Image: IMG_0988.jpg]](https://lh5.googleusercontent.com/-vN5Yzny4yzg/UtCc9iKuW-I/AAAAAAAAB2E/gLx9t9jmJ8g/s1280/IMG_0988.jpg)


![[Image: IMG_20140118_182150666_zpsd9axmnm6.jpg]](http://img.photobucket.com/albums/v466/kenm10759/Dads%20shop/IMG_20140118_182150666_zpsd9axmnm6.jpg)
![[Image: IMG_20140118_182033581_zpsjgfcp99k.jpg]](http://img.photobucket.com/albums/v466/kenm10759/Dads%20shop/IMG_20140118_182033581_zpsjgfcp99k.jpg)
 .
.![[Image: TomsTechLogo-Profile.png]](http://tomstechniques.com/wp-content/uploads/2013/11/TomsTechLogo-Profile.png)
![[Image: IMG_2103-r_zpsd2887022.jpg]](http://img.photobucket.com/albums/v466/kenm10759/Dads%20shop/IMG_2103-r_zpsd2887022.jpg)
![[Image: IMG_2102-r_zpsc58b863e.jpg]](http://img.photobucket.com/albums/v466/kenm10759/Dads%20shop/IMG_2102-r_zpsc58b863e.jpg)
![[Image: IMG_2100-r_zpsbe2d5136.jpg]](http://img.photobucket.com/albums/v466/kenm10759/Dads%20shop/IMG_2100-r_zpsbe2d5136.jpg)
![[Image: IMG_2104-r_zps7c4543c8.jpg]](http://img.photobucket.com/albums/v466/kenm10759/Dads%20shop/IMG_2104-r_zps7c4543c8.jpg)

![[Image: IMG_2097-r_zpsbaa05a04.jpg]](http://img.photobucket.com/albums/v466/kenm10759/Dads%20shop/IMG_2097-r_zpsbaa05a04.jpg)
![[Image: IMG_0981.jpg]](https://lh6.googleusercontent.com/-vxyB6dvKdRE/UtxDISFMp-I/AAAAAAAAB2g/zN2cxA-Jy0Y/s1280/IMG_0981.jpg)