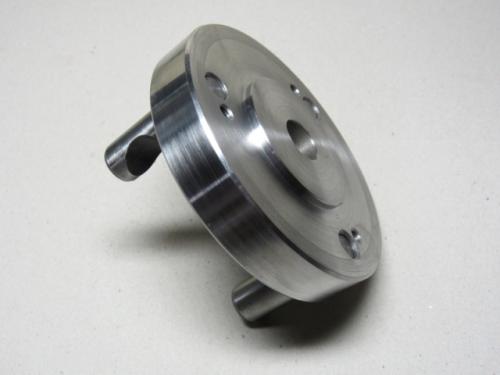
The Adapter plate.

A billet of 110mm dia BMS, (bright mild steel) was faced and the out side lightly skimmed, I now have the face and the out side of the billet perpendicular to each other. This is the face that will have the taper to fit to the lathe nose spindle, it is best not to remove it from the chuck at this stage.
![[Image: normal_IMG_0164.JPG]](http://www.nam-engineering.com/cm/albums/userpics/10008/normal_IMG_0164.JPG)
I then decided to mark the PCD of the pins and lightly centre punch. (Just in case). I may not need or use them, depends when I go to the mill and how I feel.
![[Image: normal_IMG_0165.JPG]](http://www.nam-engineering.com/cm/albums/userpics/10008/normal_IMG_0165.JPG)
Drilled a thro, hole 17mm and bored a hole 60mmdia x 12mm deep.
![[Image: normal_IMG_0168.JPG]](http://www.nam-engineering.com/cm/albums/userpics/10008/normal_IMG_0168.JPG)
Now we come to do the taper, I havent reset the compound slide so it is still set to the correct taper (Hopefully!). To cut the taper turn the boring upside down and reset to the correct height begin to cut the taper furthest from you with the lathe running in its normal forward mode. It was done this way because the taper had already been set whilst making the Dummy Spindle Nose. http://www.metalworkingfun.com/showthread.php?tid=317
![[Image: normal_IMG_0169.JPG]](http://www.nam-engineering.com/cm/albums/userpics/10008/normal_IMG_0169.JPG)
Keep trying the gauge until it goes in the exact mount as it did for the four jaw chuck I used, use a feeler gauge to measure and check
![[Image: normal_IMG_0174.JPG]](http://www.nam-engineering.com/cm/albums/userpics/10008/normal_IMG_0174.JPG)
And there it is.
![[Image: normal_IMG_0178.JPG]](http://www.nam-engineering.com/cm/albums/userpics/10008/normal_IMG_0178.JPG)
Now I will turn it around and face the other side, to give a nice face for the operation on the mill.
After a bit of drilling, tapping and counter boring. Still needs to be de-burred and cleaned but I couldnt resist just trying one.
![[Image: normal_IMG_0182.JPG]](http://www.nam-engineering.com/cm/albums/userpics/10008/normal_IMG_0182.JPG)
All cleaned and de-burred, now it is back to the lathe.
![[Image: normal_IMG_0185.JPG]](http://www.nam-engineering.com/cm/albums/userpics/10008/normal_IMG_0185.JPG)
Just needed a 55mm dia register cut, by 3.5 mm deep. At this point the adapter plate is centre punched so that it will from now always go on to the nose spindle in the same position.
![[Image: normal_IMG_0195.JPG]](http://www.nam-engineering.com/cm/albums/userpics/10008/normal_IMG_0195.JPG)
And thats the Camlock D1-4 Adapter Plate finished
![[Image: normal_IMG_0199.JPG]](http://www.nam-engineering.com/cm/albums/userpics/10008/normal_IMG_0199.JPG)
![[Image: normal_IMG_0201.JPG]](http://www.nam-engineering.com/cm/albums/userpics/10008/normal_IMG_0201.JPG)

DaveH
A billet of 110mm dia BMS, (bright mild steel) was faced and the out side lightly skimmed, I now have the face and the out side of the billet perpendicular to each other. This is the face that will have the taper to fit to the lathe nose spindle, it is best not to remove it from the chuck at this stage.
I then decided to mark the PCD of the pins and lightly centre punch. (Just in case). I may not need or use them, depends when I go to the mill and how I feel.
Drilled a thro, hole 17mm and bored a hole 60mmdia x 12mm deep.
Now we come to do the taper, I havent reset the compound slide so it is still set to the correct taper (Hopefully!). To cut the taper turn the boring upside down and reset to the correct height begin to cut the taper furthest from you with the lathe running in its normal forward mode. It was done this way because the taper had already been set whilst making the Dummy Spindle Nose. http://www.metalworkingfun.com/showthread.php?tid=317
Keep trying the gauge until it goes in the exact mount as it did for the four jaw chuck I used, use a feeler gauge to measure and check
And there it is.
Now I will turn it around and face the other side, to give a nice face for the operation on the mill.
After a bit of drilling, tapping and counter boring. Still needs to be de-burred and cleaned but I couldnt resist just trying one.
All cleaned and de-burred, now it is back to the lathe.
Just needed a 55mm dia register cut, by 3.5 mm deep. At this point the adapter plate is centre punched so that it will from now always go on to the nose spindle in the same position.
And thats the Camlock D1-4 Adapter Plate finished

DaveH


