10-27-2017, 07:01 PM
I haven’t put in much time on this project – eye surgery, the recovery process, problems with the surgery, etc, etc, etc have interfered. But today I wired up the little motor and tried out the concept, which was successful. A few notes on where I am to date.
I happened to have a fairly large chunk of ¾ inch (19 mm) jig plate left over from another project and it was a good width for the concept that I had in mind – just a bit larger than the motor diameter plus room for attaching legs (there will be three, configured like a surface plate support).
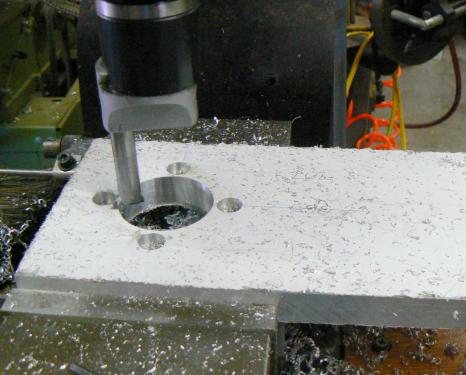
In the following photo, the jig plate looks strange – this is because it is coated with a white plastic film for protection during machining. After measuring the mounting studs on the motor, I drilled, counter-bored and bored for motor + arbor.
I’ll pause for a moment just to make a comment. Because there were five interfaces from the arbor and the retaining nut to the diamond wheel, I attempted to make the parts that mount the wheel (arbor and retaining nut) in one setup to produce all critical dimensions.
The idea, of course, is that all surfaces that touch the wheel should be parallel, perpendicular and in the case of the motor shaft and the mounting spigot for the wheel, as close a fit as possible without having to use a press.
I went to such finicky extremes as to bore the hole in the retaining nut before tapping it. The parts were not removed from the four-jaw chuck until all critical surfaces were turned and bored.
This presented me with my first problem. I had no boring bar tiny enough to fit in a ¼ inch (6 mm) hole. The motor shaft is .3125 inches (8 mm), the end of which is nicely threaded to 5/16-18UNC-2A or 2B. In order to produce a close fit with the motor shaft, I needed to start with a pilot hole, something around ¼ inches – about 6 mm.
So I spent some thirty minutes of perfect boredom, grinding away at a piece of ¼ inch (6 mm) square HSS. I guess it’s not obvious in the photo (should have posed something to establish the scale reference) but the diameter of the bar is about .150 inches (2 mm). The small boring tool is fitted into an adaptor which is then secured in a large boring bar.
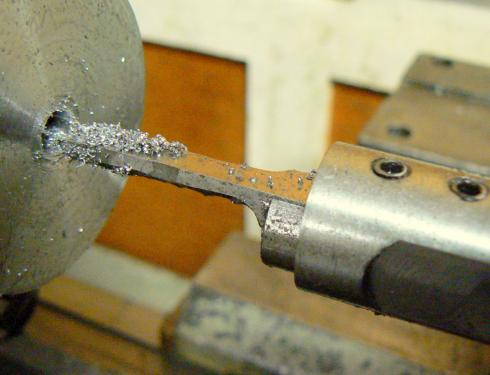
And off we go, boring the arbor, the most critical part of the entire assembly. My intent was to bore to about .310 and then ream to the final dimension of .3125. But sometimes I encounter problems with reaming – different lubricants/coolants produce holes that may vary as much as .0005 (.01 mm) and I was looking for a much better fit on the shaft.
Since the wheel is about four inches diameter, .0005 error in the fit of the arbor to the shaft will be multiplied and might result in unacceptable runout/wobble ! So I spent about fifteen minutes making spring pass after spring pass, trying the motor shaft after each one, until I could push the shaft into the bore with some gentle tapping from the heel of my hand.
In the same setup, the arbor was faced so that it was perpendicular with the shaft bore within the limits of my old lathe. Everything was locked and tightened for this operation. Next, the 1.25 inch (31 mm) diameter spigot fit for the diamond wheel was turned – carefully – until the wheel could be just barely nudged on with my hand.
Although there were no critical dimensions on the far side of the arbor (the side facing the motor), still I wanted to make everything as symmetrical as possible to reduce vibration and consequently runout/wobble. So after placing a 5/8 (16 mm) diameter steel rod in the lathe collet, I turned a short 5/16 (8 mm) diameter mandrel for a light press fit with the arbor hole and then single-pointed a 5/16-18 thread on the end.
I used the tailstock to press the arbor partly onto the mandrel followed by a 5/16 nut that pressed the arbor home, against the collet face. There is no photo but the 2 inch (50 mm) O.D. arbor was then turned down to a 5/8 (16 mm) inch diameter hub. (I neglected to mention that I started out with a rusty old piece of steel about three inches (75 mm) in diameter and by the time that I finished the two wheel mounting parts, most of the steel was in the chip pan.)
Next step was to drill a hole for pinning the arbor to the motor shaft and then to mill wrench flats on two sides of the arbor. This is necessary to hold the shaft stationary while installing/removing the wheel, tightening/loosening the retaining nut. I don’t have a photo of this operation either. It was approaching dinner time and I was tired from a long day.
Backtracking for a moment, I’d started at about 10:00 AM and almost immediately the primary drive belt on the old Sheldon lathe started flapping and beginning to shred. These old under-drive machines have a very sophisticated drive system, a marvel of mechanical engineering in some respects.
BUT whoever designed the drive clearly didn’t have to work on it. I actually have a maintenance manual for this machine and after struggling for a while, I consulted it for removal/installation instructions. I could NOT believe it when the caption read “installation and removal of primary drive belt is self-evident”. Not to me !
It took nearly an hour, working with a flashlight in my teeth, just to remove the old belt. It finally came off with the creative use of several C-clamps (which makes me think that there must have been a special tool). Drove to the nearest auto parts store, of course.
The young man behind the counter asked, “What vehicle did this come from”. Without blinking, I replied “1945 Sheldon EXL”. He almost walked away to look at his master belt catalog, ha-ha-ha. He found a belt that was the correct length but only 3/8 (9 mm) wide. Finally, he found a ½ (12.5 mm) wide belt just a tad larger than the original.
It now works but there are a few bolts and washers left over from the adjustment system. It’ll do until I can get a replacement from Browning at which time the leftover parts will be re-installed.
The next day, I made the retaining nut, from the same chunk of rusty steel. I should note that both the arbor and the retaining nut are substantial pieces of work, together with the wheel weighing about 4 pounds (2 kg). I could have made both from non-ferrous materials but on the advice of the man whom I most respect (both engineering AND machining/fabrication), I put as much weight as practical on the end of the motor shaft to reduce “float”.
First chore was to drill .226 inch (5.6 mm) x ¾ inch (19 mm) and then bore it with the skinny little boring bar to .256 (6.4 mm) followed by tapping and facing. Removing from the four-jaw, the part was threaded onto the mandrel that I’d made for the arbor (remember that the end was threaded) and drove it home with a nut then turned the features on the back of the nut.
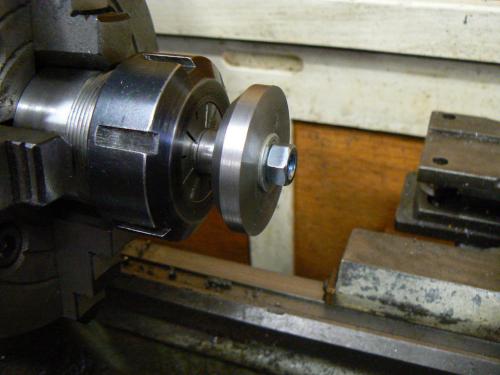
BTW, you haven’t LIVED until you’ve parted a three inch diameter chunk of rusty steel, ha-ha-ha. Just looking at the blade sticking out over 1-1/2 inches gave me shivers but all went without drama.
As I’ve mentioned elsewhere, a heavier feed than intuition suggests will often calm down chatter, all other parameters being correct. And never take for granted that the parting tool is on center ! Most QC parting tool holders angle the blade slightly upward. If you move the blade in or out, of course the blade is no longer on center !
I milled two spanner slots in the top of the retaining nut for tightening/loosening.
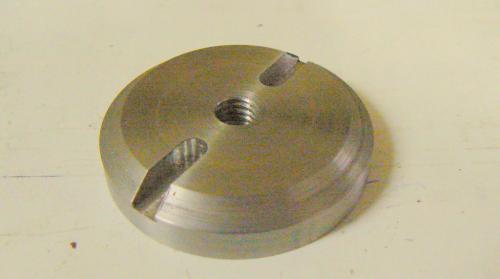
The arbor was tapped gently onto the motor shaft and pinned then the assembly was mounted to the baseplate. With wheel installed and secured with the retaining nut, I was ready to take it for a test drive. Until I realized that the dangling wires beneath the motor weren’t connected to anything.
After temporarily wiring the motor, here we go on a trial run. I should note that the wheel has not yet been dressed (I have a plan for dressing the wheel with the entire assembly held on the vertical mill). Nevertheless, the runout/wobble was impressively low. After temporarily clamping a cutting tool on the tripod head, I started grinding (polishing might be a better description, LOL).
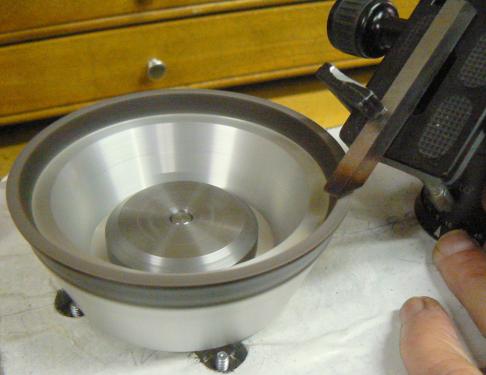
I made no effort to cool the tool during the process – I just wanted to check it out quickly, it was time to relax with a beer. The little motor purred quietly, there was no perceptible vibration caused by imbalance. (At this point, the contraption is parked on top of a couple of 2 x 4’s on my workbench.)
This is a very interesting photo, taken on my kitchen table. What appear to be horizontal lines from the grinding operation are not. What you observe is the reflection from a kitchen window with the Venetian blinds half-way down. The horizontal lines are the slats of the blinds and the bright spot below them is the open window.
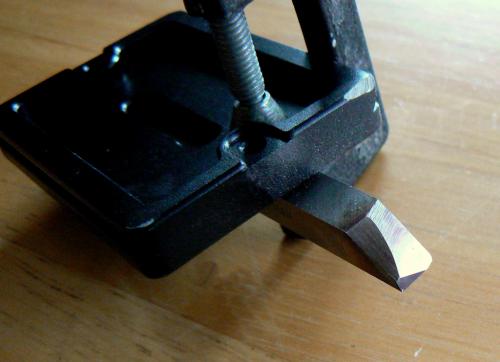
OK, the acid test: was the cutter sharp ? Judge for yourself:
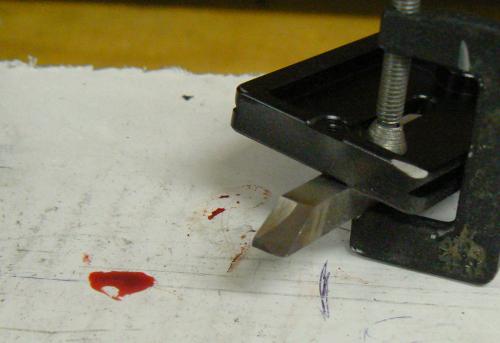
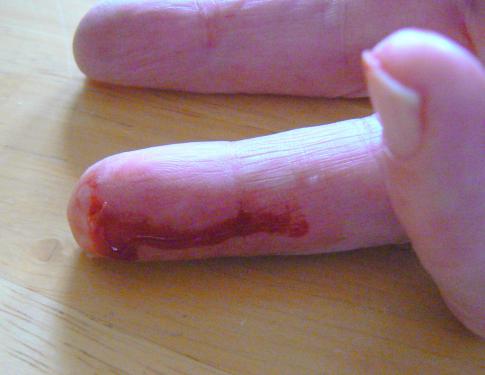
This isn’t actually as bad a laceration as it appears to be. The cut was a small one, near the fingertip. The blood just dripped down the finger because I was holding it vertical.
At this point I’m somewhere in the neighborhood of half done. Clearly I wanted to test the concept before investing a lot of time in the project (although I probably have fifteen or twenty hours in it already !!!).
Cheers -
I happened to have a fairly large chunk of ¾ inch (19 mm) jig plate left over from another project and it was a good width for the concept that I had in mind – just a bit larger than the motor diameter plus room for attaching legs (there will be three, configured like a surface plate support).
In the following photo, the jig plate looks strange – this is because it is coated with a white plastic film for protection during machining. After measuring the mounting studs on the motor, I drilled, counter-bored and bored for motor + arbor.
I’ll pause for a moment just to make a comment. Because there were five interfaces from the arbor and the retaining nut to the diamond wheel, I attempted to make the parts that mount the wheel (arbor and retaining nut) in one setup to produce all critical dimensions.
The idea, of course, is that all surfaces that touch the wheel should be parallel, perpendicular and in the case of the motor shaft and the mounting spigot for the wheel, as close a fit as possible without having to use a press.
I went to such finicky extremes as to bore the hole in the retaining nut before tapping it. The parts were not removed from the four-jaw chuck until all critical surfaces were turned and bored.
This presented me with my first problem. I had no boring bar tiny enough to fit in a ¼ inch (6 mm) hole. The motor shaft is .3125 inches (8 mm), the end of which is nicely threaded to 5/16-18UNC-2A or 2B. In order to produce a close fit with the motor shaft, I needed to start with a pilot hole, something around ¼ inches – about 6 mm.
So I spent some thirty minutes of perfect boredom, grinding away at a piece of ¼ inch (6 mm) square HSS. I guess it’s not obvious in the photo (should have posed something to establish the scale reference) but the diameter of the bar is about .150 inches (2 mm). The small boring tool is fitted into an adaptor which is then secured in a large boring bar.
And off we go, boring the arbor, the most critical part of the entire assembly. My intent was to bore to about .310 and then ream to the final dimension of .3125. But sometimes I encounter problems with reaming – different lubricants/coolants produce holes that may vary as much as .0005 (.01 mm) and I was looking for a much better fit on the shaft.
Since the wheel is about four inches diameter, .0005 error in the fit of the arbor to the shaft will be multiplied and might result in unacceptable runout/wobble ! So I spent about fifteen minutes making spring pass after spring pass, trying the motor shaft after each one, until I could push the shaft into the bore with some gentle tapping from the heel of my hand.
In the same setup, the arbor was faced so that it was perpendicular with the shaft bore within the limits of my old lathe. Everything was locked and tightened for this operation. Next, the 1.25 inch (31 mm) diameter spigot fit for the diamond wheel was turned – carefully – until the wheel could be just barely nudged on with my hand.
Although there were no critical dimensions on the far side of the arbor (the side facing the motor), still I wanted to make everything as symmetrical as possible to reduce vibration and consequently runout/wobble. So after placing a 5/8 (16 mm) diameter steel rod in the lathe collet, I turned a short 5/16 (8 mm) diameter mandrel for a light press fit with the arbor hole and then single-pointed a 5/16-18 thread on the end.
I used the tailstock to press the arbor partly onto the mandrel followed by a 5/16 nut that pressed the arbor home, against the collet face. There is no photo but the 2 inch (50 mm) O.D. arbor was then turned down to a 5/8 (16 mm) inch diameter hub. (I neglected to mention that I started out with a rusty old piece of steel about three inches (75 mm) in diameter and by the time that I finished the two wheel mounting parts, most of the steel was in the chip pan.)
Next step was to drill a hole for pinning the arbor to the motor shaft and then to mill wrench flats on two sides of the arbor. This is necessary to hold the shaft stationary while installing/removing the wheel, tightening/loosening the retaining nut. I don’t have a photo of this operation either. It was approaching dinner time and I was tired from a long day.
Backtracking for a moment, I’d started at about 10:00 AM and almost immediately the primary drive belt on the old Sheldon lathe started flapping and beginning to shred. These old under-drive machines have a very sophisticated drive system, a marvel of mechanical engineering in some respects.
BUT whoever designed the drive clearly didn’t have to work on it. I actually have a maintenance manual for this machine and after struggling for a while, I consulted it for removal/installation instructions. I could NOT believe it when the caption read “installation and removal of primary drive belt is self-evident”. Not to me !
It took nearly an hour, working with a flashlight in my teeth, just to remove the old belt. It finally came off with the creative use of several C-clamps (which makes me think that there must have been a special tool). Drove to the nearest auto parts store, of course.
The young man behind the counter asked, “What vehicle did this come from”. Without blinking, I replied “1945 Sheldon EXL”. He almost walked away to look at his master belt catalog, ha-ha-ha. He found a belt that was the correct length but only 3/8 (9 mm) wide. Finally, he found a ½ (12.5 mm) wide belt just a tad larger than the original.
It now works but there are a few bolts and washers left over from the adjustment system. It’ll do until I can get a replacement from Browning at which time the leftover parts will be re-installed.
The next day, I made the retaining nut, from the same chunk of rusty steel. I should note that both the arbor and the retaining nut are substantial pieces of work, together with the wheel weighing about 4 pounds (2 kg). I could have made both from non-ferrous materials but on the advice of the man whom I most respect (both engineering AND machining/fabrication), I put as much weight as practical on the end of the motor shaft to reduce “float”.
First chore was to drill .226 inch (5.6 mm) x ¾ inch (19 mm) and then bore it with the skinny little boring bar to .256 (6.4 mm) followed by tapping and facing. Removing from the four-jaw, the part was threaded onto the mandrel that I’d made for the arbor (remember that the end was threaded) and drove it home with a nut then turned the features on the back of the nut.
BTW, you haven’t LIVED until you’ve parted a three inch diameter chunk of rusty steel, ha-ha-ha. Just looking at the blade sticking out over 1-1/2 inches gave me shivers but all went without drama.
As I’ve mentioned elsewhere, a heavier feed than intuition suggests will often calm down chatter, all other parameters being correct. And never take for granted that the parting tool is on center ! Most QC parting tool holders angle the blade slightly upward. If you move the blade in or out, of course the blade is no longer on center !
I milled two spanner slots in the top of the retaining nut for tightening/loosening.
The arbor was tapped gently onto the motor shaft and pinned then the assembly was mounted to the baseplate. With wheel installed and secured with the retaining nut, I was ready to take it for a test drive. Until I realized that the dangling wires beneath the motor weren’t connected to anything.
After temporarily wiring the motor, here we go on a trial run. I should note that the wheel has not yet been dressed (I have a plan for dressing the wheel with the entire assembly held on the vertical mill). Nevertheless, the runout/wobble was impressively low. After temporarily clamping a cutting tool on the tripod head, I started grinding (polishing might be a better description, LOL).
I made no effort to cool the tool during the process – I just wanted to check it out quickly, it was time to relax with a beer. The little motor purred quietly, there was no perceptible vibration caused by imbalance. (At this point, the contraption is parked on top of a couple of 2 x 4’s on my workbench.)
This is a very interesting photo, taken on my kitchen table. What appear to be horizontal lines from the grinding operation are not. What you observe is the reflection from a kitchen window with the Venetian blinds half-way down. The horizontal lines are the slats of the blinds and the bright spot below them is the open window.
OK, the acid test: was the cutter sharp ? Judge for yourself:
This isn’t actually as bad a laceration as it appears to be. The cut was a small one, near the fingertip. The blood just dripped down the finger because I was holding it vertical.
At this point I’m somewhere in the neighborhood of half done. Clearly I wanted to test the concept before investing a lot of time in the project (although I probably have fifteen or twenty hours in it already !!!).
Cheers -


