Posts: 130
Threads: 17
Joined: Dec 2016
Location: Melbourne, Australia
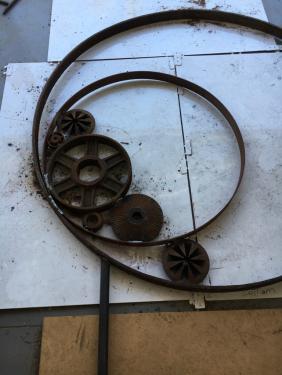
The boss (SWMBO) has allocated me the task of "joining together" some bits of old metal junk that will form her new garden sculpture.
Doesn't have to carry any real load/structure other than its own weight but needs to sturdy enough to take the occasional small grandchild attempting to climb or a decent bump with the lawnmower.
The steel bits are no drama - just weld them with the MIG.
Problem is there are some cast iron bits that need to be joined to the steel. One bit I can reasonably just drill/tap and bolt without ruining the look, but others I can't.
I've done a quick test welding a steel nut to a cast iron boss with the MIG and standard wire, but a light tap with the hammer just knocks the nut off so can't use that.
At my disposal I've got MIG/TIG and stick welders along with a MAPP gas torch. Unfortunately don't have access to oxy-acetylene gear.
I have steel and stainless wire for the MIG and general, stainless, and some eutectic 680 rods for the stick welder.
I've never done any TIG brazing before, but thinking of trying that with some preheat.
Any ideas/comments?
Steve
Posts: 2,324
Threads: 271
Joined: Jun 2014
Location: La Libertad, Philippines
11-17-2017, 11:46 PM
(This post was last modified: 11-17-2017, 11:49 PM by Dr Stan.)
Brazing is your only real method available other than some of the very high strength expensive industrial adhesives.
On afterthought, nickel rod. $10.00 for 3 sticks at Menards. Should have looked closer. Probably don't have Menards down under just yet.
Posts: 11
Threads: 1
Joined: Oct 2017
Location: Charlotte
11-18-2017, 08:26 AM
(This post was last modified: 11-18-2017, 08:28 AM by Robert.)
I have had very poor experience with TIG brazing. My joints were very weak and failed due to melting of the base metal and brittle joints. It is hard not to melt the base metal with TIG even with the amps down. I would use conventional brazing with gas. If the pieces are small MAPP gas will do it. Larger pieces may require the heat of OA. Nickel rods will work but I think that may be harder than a simple braze.
TIG brazed:
![[Image: 33963689114_695e423dcc_h.jpg]](https://farm5.staticflickr.com/4252/33963689114_695e423dcc_h.jpg)
Failure !:
![[Image: 33980852334_e40479eb6e_h.jpg]](https://farm5.staticflickr.com/4246/33980852334_e40479eb6e_h.jpg)
Robert
"but will it work when I get it back together?" - Me
Posts: 4,367
Threads: 177
Joined: Feb 2012
Location: Missouri, USA
The following 1 user Likes Highpower's post:
f350ca (11-18-2017)
"A grinder and paint - makes me the welder I ain't." ~ Doug Jackson
That said, my first choice would be oxy/acet brazing.
My second choice would be either TIG or MIG brazing with silicon bronze and straight Argon, depending on how large your parts are and how much filler you need to lay down.
As mentioned the key is to NOT melt the base material. It can be tough sometimes but it's not impossible. A couple of years ago I TIG brazed this little stainless strainer basket that I use in my ultrasonic cleaner. You can see how thin the arms of the frame are. Still holding together and I use it pretty often. Had I tried to weld this with stainless filler I'm sure the arms would have disappeared before my eyes.
Experiment with some scrap and see what works best for you before committing to any one process.

![[Image: attachment.php?aid=10450]](http://www.metalworkingfun.com/attachment.php?aid=10450)
![[Image: attachment.php?aid=10451]](http://www.metalworkingfun.com/attachment.php?aid=10451)
Willie
Posts: 2,324
Threads: 271
Joined: Jun 2014
Location: La Libertad, Philippines
Very nice work. I cannot maintain a steady position required for such precise welding/brazing/etc at this point. My college welding instructor could run a TIG bead on aluminum foil and not burn through. He also repaired monel eye glass frames using a #10 hypodermic needle on a oxy/acy tip. I never could match him.
Posts: 215
Threads: 22
Joined: Jul 2017
Location: Eureka, CA, USA
11-18-2017, 05:12 PM
(This post was last modified: 11-18-2017, 05:18 PM by randyc.)
Can't recall where I read about this MIG method but it worked just fine for me, even with my shaky hands and sh---y welding skills:
http://www.metalworkingfun.com/showthread.php?tid=3637
The trick is not to confine the parts, by where the welds are located, that lock in stresses; make the tacks in logical sequence and allow LOTS of cooling time between welds. Seemed obvious once I read the description.
Posts: 130
Threads: 17
Joined: Dec 2016
Location: Melbourne, Australia
The following 1 user Likes SteveG's post:
f350ca (11-19-2017)
Thanks guys.
Had a quick try with the MAPP gas, but decided I was going to be there all day as the parts weren't small.
While doing a bit more research I found someone who had used stainless arc rods and peening with reasonable success.
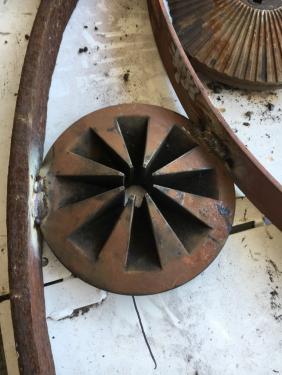
Gave it a go and seems to have worked well enough for this job.
I think the nature of the structure and position/size of the welds might have a bit to do with it.
Apologies for the photo quality - the camera on my phone just didn't like the light in the workshop today...


To give some size context the outer ring is wrought iron - I'm guessing a wagon wheel tyre. Around 1.2m (4') diameter.
Steve
Posts: 2,324
Threads: 271
Joined: Jun 2014
Location: La Libertad, Philippines
The following 2 users Like Dr Stan's post:
Highpower (11-19-2017), randyc (11-19-2017)
The stainless rods should contain a fair amount of nickle. If you have a needle scalier it should do a good job of peening W/O sending a bunch of vibrations through your hands & wrists.
Posts: 130
Threads: 17
Joined: Dec 2016
Location: Melbourne, Australia
(11-19-2017, 12:41 AM)Dr Stan Wrote: The stainless rods should contain a fair amount of nickle. If you have a needle scalier it should do a good job of peening W/O sending a bunch of vibrations through your hands & wrists.
I actually find the opposite - the needle scaler seems to give me more vibration than using a hammer. Probably some cushioned gloves would help.
Steve
Posts: 2,324
Threads: 271
Joined: Jun 2014
Location: La Libertad, Philippines
11-19-2017, 09:59 AM
(This post was last modified: 11-19-2017, 10:02 AM by Dr Stan.)
(11-19-2017, 05:41 AM)SteveG Wrote: (11-19-2017, 12:41 AM)Dr Stan Wrote: The stainless rods should contain a fair amount of nickle. If you have a needle scalier it should do a good job of peening W/O sending a bunch of vibrations through your hands & wrists.
I actually find the opposite - the needle scaler seems to give me more vibration than using a hammer. Probably some cushioned gloves would help.
Steve
Well that's good info to know as I've been thinking of getting one. Thought it would reduce the impact on my hands especially since I'm having a re-occurrence of trigger finger in my right index finger and now both thumbs are triggering.

All eight fingers have been surgically repaired and I was very surprised to learn it can come back.
I've also had carpel tunnel surgery in both wrists. Sold my forge and anvil to concentrate on machining and welding rather than forging.


![[Image: 33963689114_695e423dcc_h.jpg]](https://farm5.staticflickr.com/4252/33963689114_695e423dcc_h.jpg)
![[Image: 33980852334_e40479eb6e_h.jpg]](https://farm5.staticflickr.com/4246/33980852334_e40479eb6e_h.jpg)

 All eight fingers have been surgically repaired and I was very surprised to learn it can come back.