01-12-2018, 04:54 AM
I spent some more time on this today- I'm putting off a hated job that I should be doing elsewhere- and took some more photos along the way.
A little more detail on the face cutter grinding jig:
This is the adjustment setup for positioning the tooth to be ground
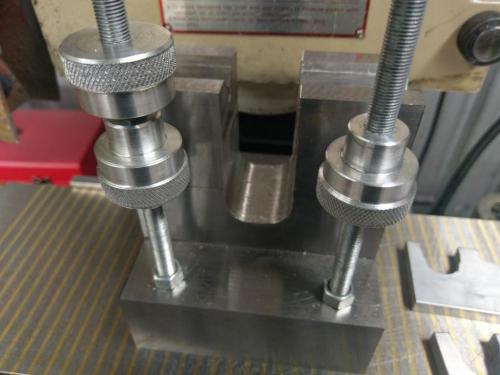
Yes I know my knurls are crap.
A plate straddles these two posts and is adjusted for height so the the tooth being ground is rotated forward of the vertical to give the primary or secondary clearance angle.
The plate is slotted on one side so that it can be swung aside for indexing between teeth, then the top knobs are tightened down to hold it in place.

there's a locking nut under each adjustment nut, a copper washer allows the locknut to be tightened without the tendency to turn the adjusting nut.
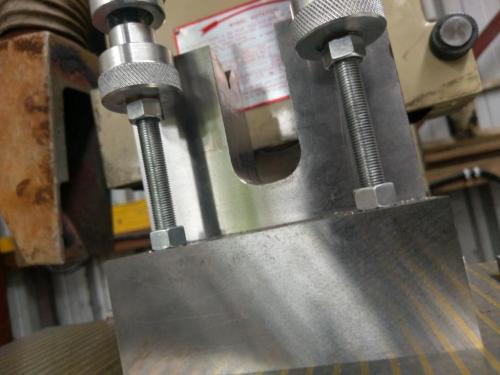
The plates are specific to a diameter of cutter, these two take 4" and 6" cutters, I made 3 more blanks that will be slotted to the appropriate depth for other cutters.
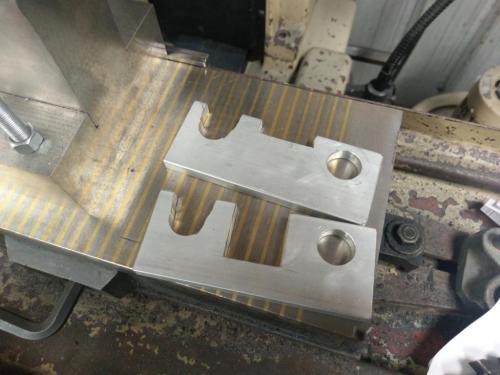
I can't see any reason why form cutters couldn't be sharpened on this jig with an appropriately shaped indexing plate and the right wheel
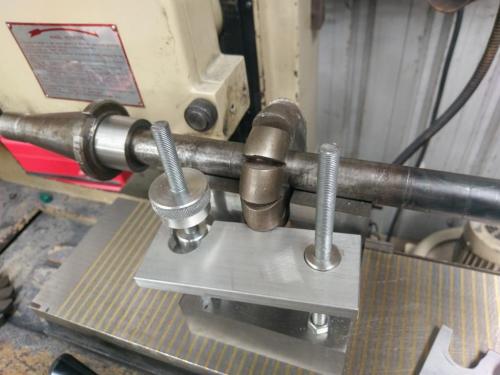
I also envisage being able to sharpen plane milling cutters cantilevered off the end of the jig, the finger for following the flutes would need to be mounted from the wheel guard rather than on the jig.
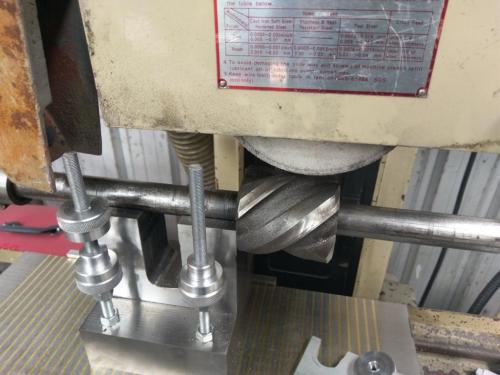
I was surprised to find that this 18" arbor cleared everything on my test run, I'm contemplating cutting it up for use on this jig as I could never quite get the bend out of the middle. All my cutters have 1" bore and imperial sized ground shaft is hard to come by here.
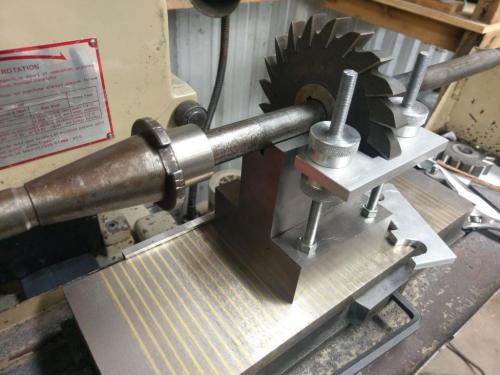
Still to be done on this one (other than to cut the excess height off the two 3/8 UNC all-thread posts) is the addition of clamps to hold the arbor into the vee, has to be low enough profile to clear the wheel when the smallest diameter cutter is being ground. I think I will then dismantle the jig and case harden the components, the vee will then have to be re-ground after reassembly. I spent a lot of time on the surface grinder making the two main components. Side-wheeling the width of big the slot in the base was the only thing that got it hot, no coolant system on my grinder. The relief slots were done with a parting tool mounted in the shaper, proved ideal for the task.
![Filename: sharpening jig base corners].jpg
Size: 187.12 KB
01-12-2018, 04:16 AM](attachment.php?thumbnail=15464)
Darn thing is scratched up already- all the more reason to harden it I guess.
I made the indexing arrangement on the side-cutter grinding jig today. A series of holes, with a simple T-piece that is placed in the best hole for the particular cutter and the stop length is adjusted to hold the tooth in line with the table. In both of these photos, the tooth set for grinding is the one above the indexing finger.
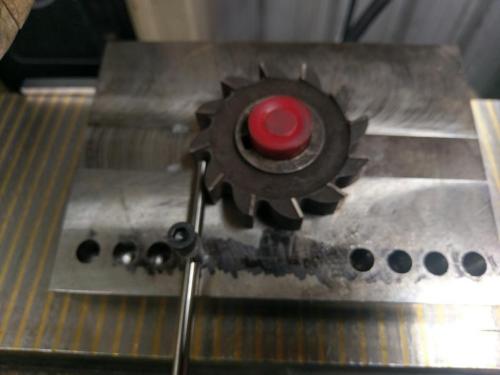
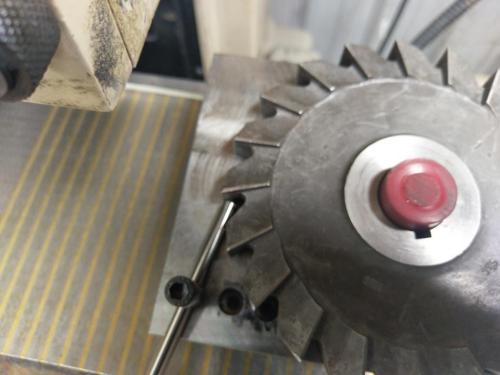
The finger always has to hold the cutter in the same direction regardless of which side is being ground, as the tooth being ground is always in the top half of the circle and of course the wheel direction doesn't change. Holding the cutter down manually is not a problem, the left hand works the crank while the right hand holds the cutter down and against the stop and rotates it between cuts.
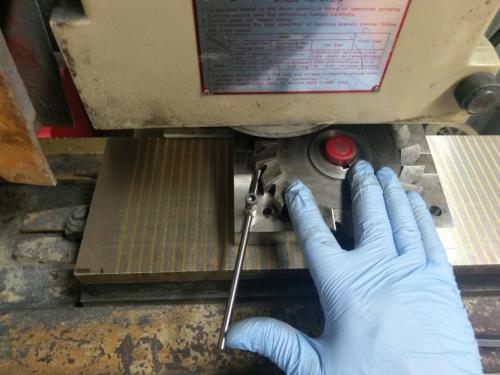
I'm very happy with how these jigs work, I need to make some test cuts with sharpened cutters before calling it good. Then I need to figure out a way to hold the big wedge piece on the grinder so that the top working surface is horizontal and I can get it properly flat before (and after) hardening it.
On a side note, today was actually the first time I have used reamers to properly match a hole size to a shaft size; I had never owned any straight reamers until I picked up a selection of metric and imperial ones at the clearing sale where I bought the surface grinder. The bouncy cushion of air when I put that precisely 10mm O.D. drill rod into that precisely 10mm I.D. hole, and the 'pop' as I pulled it out again, were very satisfying. As was the perfect sliding fit of the 6mm indexing finger in the cross-drilled post.
One small 'live and learn' experience though, the first hole I did, I selected a 9.8mm twist drill to finish the hole prior to reaming only to find the 10mm drill rod was already a sloppy fit after drilling. Switched to a 9.5mm drill for the rest of the holes and the reamer took them nicely to 10mm. I guess there must be a rule of thumb for what undersize drill to use prior to reaming?
A little more detail on the face cutter grinding jig:
This is the adjustment setup for positioning the tooth to be ground
Yes I know my knurls are crap.
A plate straddles these two posts and is adjusted for height so the the tooth being ground is rotated forward of the vertical to give the primary or secondary clearance angle.
The plate is slotted on one side so that it can be swung aside for indexing between teeth, then the top knobs are tightened down to hold it in place.
there's a locking nut under each adjustment nut, a copper washer allows the locknut to be tightened without the tendency to turn the adjusting nut.
The plates are specific to a diameter of cutter, these two take 4" and 6" cutters, I made 3 more blanks that will be slotted to the appropriate depth for other cutters.
I can't see any reason why form cutters couldn't be sharpened on this jig with an appropriately shaped indexing plate and the right wheel
I also envisage being able to sharpen plane milling cutters cantilevered off the end of the jig, the finger for following the flutes would need to be mounted from the wheel guard rather than on the jig.
I was surprised to find that this 18" arbor cleared everything on my test run, I'm contemplating cutting it up for use on this jig as I could never quite get the bend out of the middle. All my cutters have 1" bore and imperial sized ground shaft is hard to come by here.
Still to be done on this one (other than to cut the excess height off the two 3/8 UNC all-thread posts) is the addition of clamps to hold the arbor into the vee, has to be low enough profile to clear the wheel when the smallest diameter cutter is being ground. I think I will then dismantle the jig and case harden the components, the vee will then have to be re-ground after reassembly. I spent a lot of time on the surface grinder making the two main components. Side-wheeling the width of big the slot in the base was the only thing that got it hot, no coolant system on my grinder. The relief slots were done with a parting tool mounted in the shaper, proved ideal for the task.
Darn thing is scratched up already- all the more reason to harden it I guess.
I made the indexing arrangement on the side-cutter grinding jig today. A series of holes, with a simple T-piece that is placed in the best hole for the particular cutter and the stop length is adjusted to hold the tooth in line with the table. In both of these photos, the tooth set for grinding is the one above the indexing finger.
The finger always has to hold the cutter in the same direction regardless of which side is being ground, as the tooth being ground is always in the top half of the circle and of course the wheel direction doesn't change. Holding the cutter down manually is not a problem, the left hand works the crank while the right hand holds the cutter down and against the stop and rotates it between cuts.
I'm very happy with how these jigs work, I need to make some test cuts with sharpened cutters before calling it good. Then I need to figure out a way to hold the big wedge piece on the grinder so that the top working surface is horizontal and I can get it properly flat before (and after) hardening it.
On a side note, today was actually the first time I have used reamers to properly match a hole size to a shaft size; I had never owned any straight reamers until I picked up a selection of metric and imperial ones at the clearing sale where I bought the surface grinder. The bouncy cushion of air when I put that precisely 10mm O.D. drill rod into that precisely 10mm I.D. hole, and the 'pop' as I pulled it out again, were very satisfying. As was the perfect sliding fit of the 6mm indexing finger in the cross-drilled post.

One small 'live and learn' experience though, the first hole I did, I selected a 9.8mm twist drill to finish the hole prior to reaming only to find the 10mm drill rod was already a sloppy fit after drilling. Switched to a 9.5mm drill for the rest of the holes and the reamer took them nicely to 10mm. I guess there must be a rule of thumb for what undersize drill to use prior to reaming?
Lathe (n); a machine tool used in the production of milling machine components.
Milling Machine (n); a machine tool used in the production of lathe components.
Milling Machine (n); a machine tool used in the production of lathe components.


