Posts: 4,683
Threads: 93
Joined: Feb 2012
Location: Perth, Australia
01-02-2014, 06:43 AM
(This post was last modified: 01-02-2014, 06:47 AM by Mayhem.)
Ken has very kindly offered to make a part for my mill that is no longer available and I need to be able to provide a good drawing of the part.
My drawing skills are not that good and there is a fair amount of detail in the part, in terms of the shape, holes and a slot. There is also a missing part, which I can extrapolate from pictures I have and also from the drawings provided in the Kondia manual.
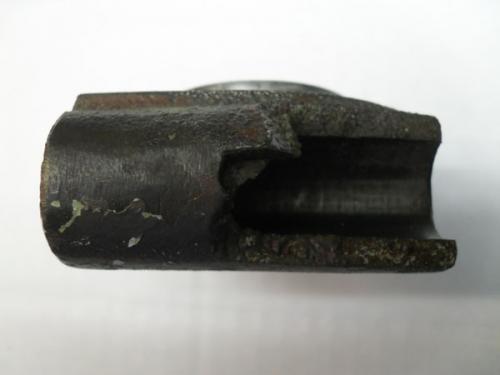
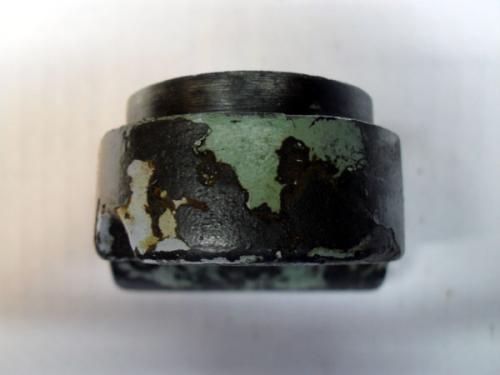
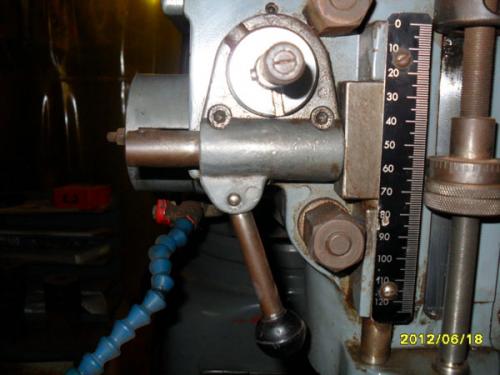
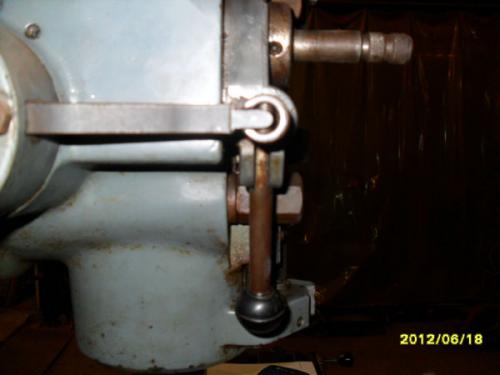
Below are some pictures of the part from all angles, as well as some from another mill. The front view is fairly straight forward but the view from the top has me a little confused, as there are 3 holes and a counterbore running front to back, as well as a hole and a slot running left to right (the slot only part way), so it is going to get pretty busy. When looking at the front, there is a semicircular cut out at about 315°, which I am also unsure how to draw.
Should I have more than three projections (front, side, top)?
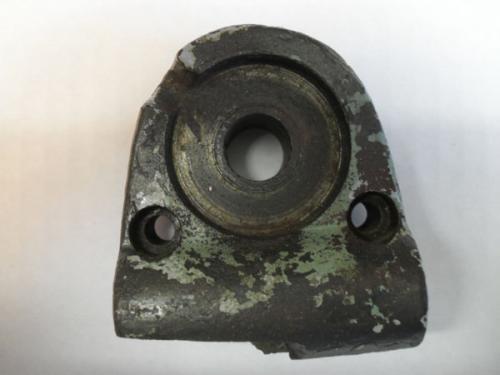
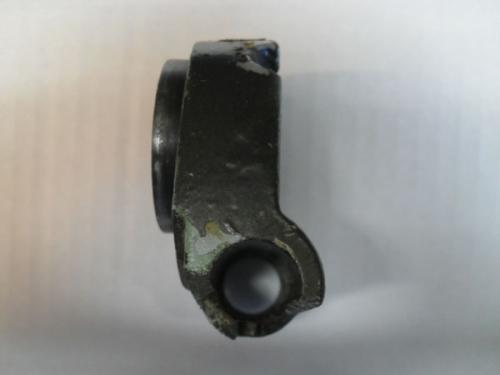
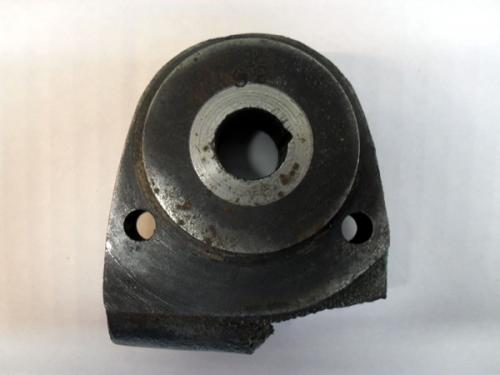
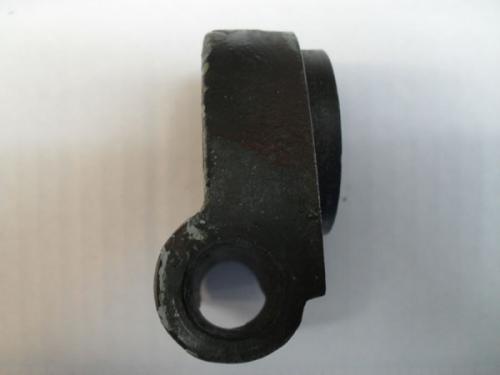
Hunting American dentists since 2015.
Posts: 642
Threads: 14
Joined: Oct 2013
Location: East Sussex, UK
That looks pretty well identical to the standard Bridgeport one - surely it must be available from a breaker ?
Andrew
Andrew Mawson, proud to be a member of MetalworkingFun Forum since Oct 2013.
Posts: 4,683
Threads: 93
Joined: Feb 2012
Location: Perth, Australia
Hi Andrew - I agree with your assessment, as the FV-1 is a copy of the BP. Finding a wrecker with one would be more time and effort than it is worth. Once I get the measurements sorted out, a supplier of BP parts is going to be my first port of call. I'm not going to waste Ken's time unless I really have to.
Hunting American dentists since 2015.
Posts: 1,827
Threads: 51
Joined: Apr 2012
Location: Oklahoma
I'm not very good but would take a stab at drawing it up, BUT would need the part in hand to do it with. I don't see it as that hard to draw, you have the basic information already in the part.
That one slot that is at and angle, I would slide the housing on a shaft and put it in some Vee Blocks on the Surface Plate then use a Protractor to find the angle.
dallen, proud to be a member of MetalworkingFun Forum since Apr 2012.
If life seems normal, your not going fast enough! 
Posts: 4,683
Threads: 93
Joined: Feb 2012
Location: Perth, Australia
01-02-2014, 10:02 AM
(This post was last modified: 01-02-2014, 10:04 AM by Mayhem.)
Thanks Dave - I'm not looking for someone to draw it up, just to give me some pointers. The drawing from the Kondia manual shows that slot to be 45° to the vertical. I'm just not sure which projection to put it on. The overlap of hidden lines in the top/bottom projection is what has me stumped. There is a lot going on when you look at all the holes.
I could just send the part I have to Ken and ask him to figure it out but I don't want to risk our friendship  (that's him on the right!).
Seriously - I want to learn how to draw things like this. I can use CAD, I just don't know how to approach this part.
Hunting American dentists since 2015.
Posts: 22
Threads: 2
Joined: Dec 2013
Location: Inver Grove, MN
I hope this does not get too long - but what you are undertaking is not a trivial task. I don't have any quick and definite answers - but here's some guidelines on how to do the drawing(s).
The Atlas-Clausing engineering department probably had at least two drawings to describe this part:
1) A drawing of the rough casting - which was used to make the pattern for the foundry work
2) A drawing of the machining work on the casting
Am I correct to guess that the part will be made from a piece of bar stock rather than a casting? If so, both the drawing technique and the machining technique will be different from the original part. The real difference will be that the initial set-ups and work on the critical dims can be done with stock that is pretty much flat and square - easy to mount in a vice or clamp to the table. (Working on a raw casting usually took some special set-up efforts). If it were me, I would want to do the drilling and boring while the part was still a rectangular block - then, add the "casting" features after the critical work is done.
So I am thinking two drawings.
1) Dwg 1 shows the critical holes, bosses and bores applied to rectangular shaped part.
2) Dwg 2 shows whatever of the casting features you think you want to add to make the part look somewhat original.
For Dwg 1, both you and the machinist get to dimension and work from 3 perpendicular planes x,y,z (you only get to use 3, the other 3 surfaces of the stock just come along for the ride and are never referenced). This portion of the machining work can easily be done on a manual mill. You get to describe, dimension and tolerance the critical dims without having all the casting features in the way. For my taste, I think this drawing is 5 views with a section cut of the "U" slot. The 5 views (using the names you have already started) are Front, Left, Right, Bottom, and Back. The Section View is an abbreviated cut perpendicular to the axis of the U slot with just enough Dims to show the location and width of the U. Since the Section is a "cut" you get to conveniently show the surface of the bore as an "elevation" reference to the center of the radius of the slot.
For Dwg 2, CNC will be the easiest machining technique, if available. Otherwise a lot of hand grinding and fitting will be required. The good news is that few, if any, of the casting features such as drafts and radii are critical. This drawing also has several views with one or two sections to show the different casting features. Since most of these features are not critical, you can describe one feature and then state that the same feature is "Typical" on all of the part. This works well for convex radii, concave radii and for drafts. The square reference planes will disappear as this portion of the work is done, so all of the dims need to be referenced back to features that were generated in the first drawing (bores and bosses). Don't include any of the Dims from Dwg 1 on Dwg 2 unless they really need to be there for the machinist to reference (and then label the dimension as "Ref" so he knows that there is nothing to be done for this dim).
Be aware that different countries interpret the L-R and Top-Btm views differently. If a fellow DownUnder is doing the work, this will not be a problem. German drawings (and maybe a few others) are backwards from the American system.
One of the drafting challenges will be getting the critical dimensions off of the existing part in a way such that the accuracy can be preserved on the drawing. The boss, the c-bore and the hole for the rotating shaft all need to be concentric to some degree. The machinist gets to make two of these features on one set-up (without flipping the part), so decide which of the two are more critical and dimension them together with a concentricity tolerance (+- .001 is not out of line here). For the 3rd feature, which requires flipping the part, dimension from the center of the hole (which can be indicated after the part is flipped). Here, +-.001 is asking for a lot of indicating, so decide if you can give him +- .002 or whatever. In both cases, the concentricty tolerance is separate from the diameter tolerance.
Likewise, the distance from the center of the boss and c-bore to the center of the bore for the plunger is probably critical. You will have to take some measurements on a flat surface (granite or machine table), with the plunger installed. Take measurements in every possible way and then do some math to see if they agree with one another. Also keep in mind that the original designer probably selected an "even" number for this dimension. So if you come up with 1.502, the original part was probably designed at 1.500.
I have worked with draftsmen who would sketch up a part like this by hand and then send through the machine shop without issues. You are probably going to work with a drafting table or a CAD program. If you are a CAD wizard (and the machining will be CNC), you could generate a database to build the part - but that's a lot of work and I think unnecessary in this case. But, basic CAD technique will force you to do some work that will confirm if the measurements you took from the part make sense.
Here are a few of my other notes for what they are worth:
The old rule pounded into draftsmen from the early days, is that the drawing needs to be presented in the way that the part will be fabricated. The draftsman has to have enough machining knowledge to describe the features and dimensions in a way that will make sense to the machinist. Describe the critical dimensions first, and the least critical last. Don't include dimensions that have no use to the machinist. Never "double dimension" - if you do this, the machinist never knows which dimension you actually want to "hold." Always dimension to a feature that the machinist will be able to locate accurately - and will be able to easily check for accuracy after completion. The machinist assumes that every dimension on the part will be some step in the process. Always try to dimension in a way that can be "checked" after machining. In the case of features that require some math, such as hole spacing on bolt circles, describe the feature in the standard way and let the machinist do the math, trig, use his DRO or whatever to achieve the feature. Don't ask for accuracy that you don't need. The machinist will usually deliver accuracy that exceeds the drawing tolerances, but he will welcome some "slop" that allows him to not have to re-make a part that failed on what was actually a non-critical dimension.
Terry S.
Posts: 3,002
Threads: 51
Joined: Apr 2012
Location: Ontario
I think your over analyzing this Mayhem. A set of proper engineering drawings would allow a machinist to make a part that he's never seen and has no idea where it goes, what it does or what it fits against. Ken has an advantage here. The undimensioned drawing you have with an end view and the boss at the back should pretty muck nail it down. Sketch it up like Terry said some draftsmen could do and send it through to the machine shop.
That said one feature that concerns me, the rear mounting face appears in the photo to be at an angle to the boss and bore, hopefully thats just an illusion from the photo. Does the slot at 315 degrees do anything?
Free advice is worth exactly what you payed for it.
Greg
Posts: 4,683
Threads: 93
Joined: Feb 2012
Location: Perth, Australia
Thank you Terry. I'm going to have to read that a few times to let it sink in but I really appreciate the length to which you have gone in your descriptions. At the moment, the only other parts I have are the head casting (into which the boss fits), the shaft the extends through the centre hole (through the boss) and the shaft that moves through the lower bore. The rest will be ordered from Kondia, so I will probably have to wait until they arrive.
Hunting American dentists since 2015.
Posts: 4,683
Threads: 93
Joined: Feb 2012
Location: Perth, Australia
01-02-2014, 11:09 AM
(This post was last modified: 01-02-2014, 11:14 AM by Mayhem.)
Thanks Greg. I have no idea what the slot does. I can only imagine it is there for lubrication. Perhaps some of the BP owners can tell me if that feature is present on their machines and if so, what it is for. I'll have to check the angle but I am sure it is due to my crappy photography.
As for over analyzing it, you may well be correct there. I 'think' for a living and have a hard time turning it off. I was the kid always asking "why?" and I'm sure I drove my folks nuts because I wouldn't take "because I said so", or "you don't need to worry about that" for an answer 
Hunting American dentists since 2015.
Posts: 3,795
Threads: 183
Joined: Jun 2012
Location: Farmington Hills, Michigan
(01-02-2014, 06:43 AM)Mayhem Wrote: Ken has very kindly offered to make a part for my mill that is no longer available and I need to be able to provide a good drawing of the part.
My drawing skills are not that good and there is a fair amount of detail in the part, in terms of the shape, holes and a slot. There is also a missing part, which I can extrapolate from pictures I have and also from the drawings provided in the Kondia manual.
Below are some pictures of the part from all angles, as well as some from another mill. The front view is fairly straight forward but the view from the top has me a little confused, as there are 3 holes and a counterbore running front to back, as well as a hole and a slot running left to right (the slot only part way), so it is going to get pretty busy. When looking at the front, there is a semicircular cut out at about 315°, which I am also unsure how to draw.
Should I have more than three projections (front, side, top)?
Darren,
You'll need a front view (top pic) to show the part outline, mounting holes, large counter-bored hole and the hole for the lever, a left side view to show the slot width and depth in the missing piece, an auxiliary view on roughly 45º to show the cast slot, a back view to show the raised hub and a bottom view to show the slot length in the missing piece.
I have to agree that the part looks VERY similar to the corresponding part on a Bridgeport. It's called a feed trip bracket and Google Images is full of them. There is also an auction for one on ebay accepting offers.
Tom
![[Image: TomsTechLogo-Profile.png]](http://tomstechniques.com/wp-content/uploads/2013/11/TomsTechLogo-Profile.png)
|


 (that's him on the right!).
![[Image: TomsTechLogo-Profile.png]](http://tomstechniques.com/wp-content/uploads/2013/11/TomsTechLogo-Profile.png)