Posts: 215
Threads: 22
Joined: Jul 2017
Location: Eureka, CA, USA
The following 1 user Likes randyc's post:
f350ca (08-28-2017)
(08-27-2017, 09:38 PM)f350ca Wrote: Nice design on the expanding wrench Randy. Will have to keep that idea.
The idea must have come to me in a dream, ha-ha-ha. I can't recall seeing it before but when I first posted the idea on PM, two guys suggested that it was a form of "Sprag Clutch" whatever the heck that is !
That skinny little snap ring that holds the three rollers to the tool was machined from the one inch rod of O-1 and oil hardened. THAT was a fiddly little job and waste of material !
Still it was fun. I think 
Posts: 4,367
Threads: 177
Joined: Feb 2012
Location: Missouri, USA
The following 2 users Like Highpower's post:
f350ca (08-28-2017), randyc (08-28-2017)
(08-27-2017, 10:06 PM)randyc Wrote: The idea must have come to me in a dream, ha-ha-ha. I can't recall seeing it before but when I first posted the idea on PM, two guys suggested that it was a form of "Sprag Clutch" whatever the heck that is !
A sprag clutch or bearing is designed to lock up (and apply torque) in one direction, but it freewheels in the opposite direction. Your design works in both directions obviously. I like it! I have a couple of internal pipe "wrenches" that work on a similar principal. Just the thing for installing or extracting a very short piece of pipe (like a close nipple) or things like a shower arm that broke off inside the wall. 
Willie
Posts: 215
Threads: 22
Joined: Jul 2017
Location: Eureka, CA, USA
Pipe nipples - that's a cool way to get them out. The internal "jaws" are serrated ?
Posts: 2,596
Threads: 99
Joined: Dec 2014
Location: Michigan
The following 2 users Like Vinny's post:
f350ca (08-28-2017), randyc (08-28-2017)
Similar concept to a pin chuck often used in wood turning.
Posts: 215
Threads: 22
Joined: Jul 2017
Location: Eureka, CA, USA
The following 1 user Likes randyc's post:
f350ca (08-28-2017)
Since making that spindle tool, I've had different thoughts about design improvement. One of them was to revise the shape of the shallow grooves in which the rollers ride to a convex shape. This would have a more gradual ramp than the concave shape, providing more mechanical advantage and greater wedging security. Although the features in the following sketch have been exaggerated, the concept is clear I think.
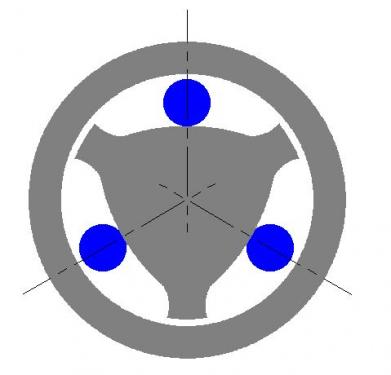
The retaining ring concept would have to change because, unlike the original configuration which tends to self-center the rollers, this configuration would probably skew them. Anyway, it's all moot; there's no reason for me to ever make another one since the current tool works.
Vinnie, I just googled "pin chuck" (never heard of it before) and you're dead right, it's very similar. I copped this sketch from the "Fine Woodworking" web site:
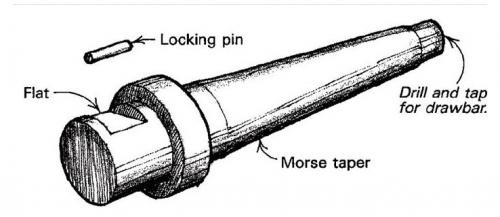
Good call !
Posts: 2,596
Threads: 99
Joined: Dec 2014
Location: Michigan
The one I made was just a 3/4" bar about 8" long that I milled a flat in so I could use a nail for the pin. Worked great till I got the wood too thin and it split at the pin!
Posts: 215
Threads: 22
Joined: Jul 2017
Location: Eureka, CA, USA
The following 1 user Likes randyc's post:
f350ca (09-05-2017)
A few years ago, I obtained two used Albrecht chucks and already owned two. There was not much further need for keyed chucks except those permanently loaded with center drill, countersink, etc, and a couple of small ¼ inch models. An older 1/2 inch Jacobs 18N, for example, was rarely used and was redundant.
I’d recently given a friend a large 3/4 drill chuck that was included with some tooling I’d obtained from eBay as a lot buy. My friend made a nice live tailstock chuck from it. I was envious and needed to have one of my own, LOL. The 18N chuck came to mind as a prospect.
For anyone unfamiliar with the tool, a live chuck (also called a rotating tailstock chuck) is free to rotate while its shank is stationary or vice versa. Properly made, the chuck is aligned with the spindle axis when inserted into the tailstock taper and has minimal runout.
The primary use is similar in purpose to a tailstock center, without the need of center drilling the workpiece: (Note that this technique can never be as precise as a dead center or a live center since it is subject to the concentricity of the chuck jaws.
Incidentally, there is a process to improve the concentricity of a Jacobs-style chuck. Since this post is already quite lengthy, it would be better discussed in another thread.
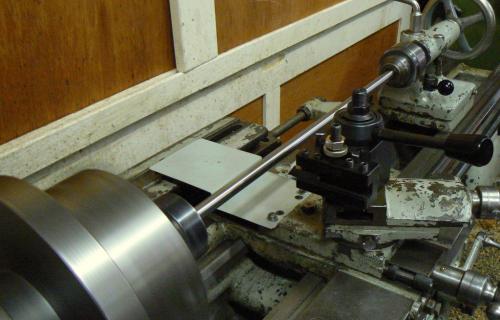 The is the live MT-2 arbor, as I made it, is <ahem> somewhat lacking in fine workmanship as can be seen in the following photo when compared to a commercial model, a photo of which is shown a few paragraphs down.
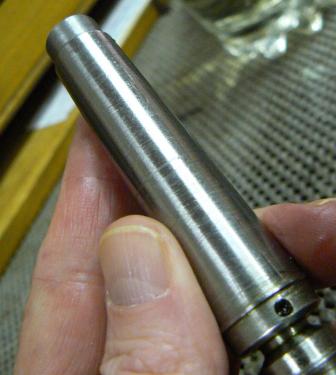 A live tailstock chuck is useful for several applications, the most common is to grip and support the end of a workpiece while allowing the workpiece to freely rotate. Or, as this ad for a live chuck states:
“Use when there is insufficient room for follower rest. Works great for truing armatures and flywheels mounted on small diameter motor shafts. MT2 shank fits a wide variety of machines. Includes chuck key. 1/2 inch capacity.”
Of course a center in the tailstock or a steady rest performs the same function, right ?
Yes, and probably quite a bit better than a live chuck in most cases but there are situations in which the live chuck is a better alternative or even the only alternative. Taking a skim cut on worn commutators of generators and D.C. motors, for example, to expose new conductive copper surfaces, as described in the ad.
Bearing surfaces at the ends of armatures are usually hardened and ground. If centerless ground, there will probably not be a center hole and the hardness might preclude center drilling and using a tailstock center.
Other applications could be to steady thin-wall tubing, support the end of brittle or abrasive material (ceramic or glass, hard rubber and fiberglass, sometimes even wood when it must be turned without center holes or marks.
But perhaps the most commonly used purpose is to support parts that are too small to be center-drilled. Note that in this situation, any eccentricity in the chuck may become a major problem.
One might use a steady rest (maybe with a spider for some materials) in most above applications except that lathe carriage travel might be limited – a live chuck in the tailstock in many situations could provide more freedom - take a look at the following:
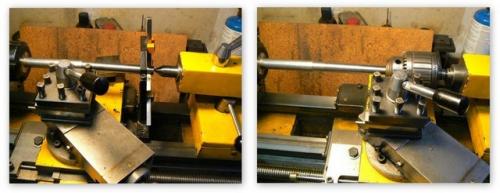 If you look carefully at the photo on the left, you’ll note that the carriage is stopped against the base of the steady rest – the carriage cannot get any closer to the end of the shaft than some six inches.
(A dead center is shown supporting the part in the photo but was used only while adjusting the steady rest. After the steady was aligned, the tailstock was withdrawn. For the sake of this example, a tailstock center cannot be used.)
In the right hand photo, using the live chuck, the carriage is free to move as far as the tailstock base. Almost the entire work is now accessible to the cutting tool. That’s a significant improvement in carriage travel that may be important.
There is always a “work-around” for situations like the previous one, but few are as quick as just installing a live chuck and getting back to work in this case. Obviously a center would be superior to either live chuck or steady rest but for example purposes we assume that we cannot use one.
The 18N chuck has a MT-2 shank which fits the tailstocks of both my 8 inch Emco (not “Enco”) and 11 inch Sheldon lathes. But because the MT-2 dimensions are small, there was not much latitude in designing the internal parts to convert the 18N to a live chuck..
Oh yes, I should note before starting that live chucks like the one below can be obtained for about $60 and are probably superior to anything I can cobble up but what would be the fun in buying one ?
 chuck7.jpg
 (Size: 26.34 KB / Downloads: 191)
Ball or roller bearings couldn’t be accommodated within the MT-2 arbor without reducing the diameter of the internal shaft to an extremity. Perhaps I could have located needle bearings that would work but I certainly had none on hand, LOL. There is very little room within the envelope of a MT-2 shank; examining the CAD sketch a few paragraphs below will make this clearer.
The commercial version uses ball bearings but, as can be seen, they are outboard of the Morse taper, extending the length of the live chuck. I preferred as short an arbor as possible.
BTW, my live chuck was never intended for heavy work, I’ve used the chuck only on ½ inch diameters. This is the spinning live chuck gripping a length of .500 ground shafting.:
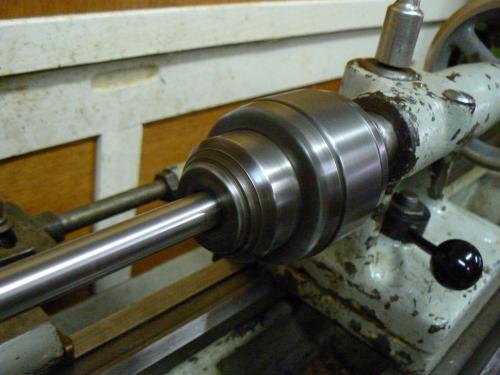 Because of the internal dimensional restrictions of the MT-2, I chose to use a long “oilite” sleeve bearing, 3/8 x 2 inches that I had on hand, to best support the rotating shaft and keep the shaft diameter as large as possible.
It was necessary to take a great deal of care when mounting this bearing so that runout was kept minimal. This was truly a challenging task, given the limitations imposed by the small taper shank. I’d estimate (don’t really remember) that turning the external Morse taper and boring/reaming for the sleeve bearing (both in the same setup) took about six hours !
Because the fit is important to maintain good runout, when I use the live chuck I usually run it for fifteen or twenty minutes at the required RPM for the operation BEFORE actually performing the operation. This brings the parts to operating temperature and minimizes the bearing clearance.
The thrust bearing is simply a hardened 3/8 inch ball. A live tailstock doesn’t experience much axial thrust so this simple expedient is adequate. The ball is lubricated with a dab of wheel bearing grease. The oilite bearing is lubricated with spindle oil. This is the CAD sketch of the live chuck arbor and it is easy to see why using ball or roller bearings would be all but impossible. Even needle bearings would strain the design concept -
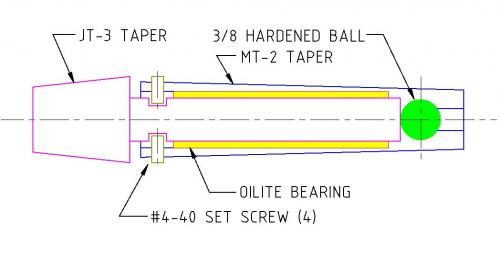 The small #4-40 set screws depicted in the sketch, protrude into a shallow groove on the internal shaft. In normal operation the screws don’t contact the rotating surface – they are there only to prevent the internal parts from separating when not in operation. Although four are noted in the sketch, I used only two, which are adequate.
Tapping Under Power
As well as supporting the end of a workpiece in the lathe, there is another useful application for the live chuck when tapping in the lathe. Most of my work is on a small scale and tapped holes can be as small as #0-80, although that is not common. Most tapped holes for my work range from #4-40 to #10-32.
Smaller tapped holes usually require some attention to prevent breakage. Perhaps breaking a tap that cost less than $3 U.S. isn’t a major concern but when the tap breaks off in a part that one has expended several hours of work … well, that IS a concern since removing the tap may not be possible.
(Which reminds me of something learned the hard way: when possible, do the most difficult operations first rather than mucking them up on a nearly-finished part.)
There are a number of ways to safely tap small holes, most are manual and time-consuming (= very boring) for hobby machinists. The live chuck can allow power tapping with taps as small as #4-40 if the chuck is well-aligned with the pilot hole.
A small lathe is highly recommended for this operation, small enough so that the tailstock can be easily moved by hand. It’s certainly possible to feed the tap by cranking the tailstock ram but it feels sort of clumsy to me.
I should note that there are many other methods that are much better than this one for power tapping small holes. This was an expediency because I didn’t have any options better than manual tapping, LOL. I made the live chuck more for fun than function but I’m surprised that I use it as often as I do, especially for tapping in the lathe.
With the lathe turning at 300-400 RPM and cutting oil brushed on the tap, the process is initiated with the operator gripping the body of the live chuck with his left hand. The loosened tailstock is gently pushed toward the headstock with the right hand, engaging the tap into the work.
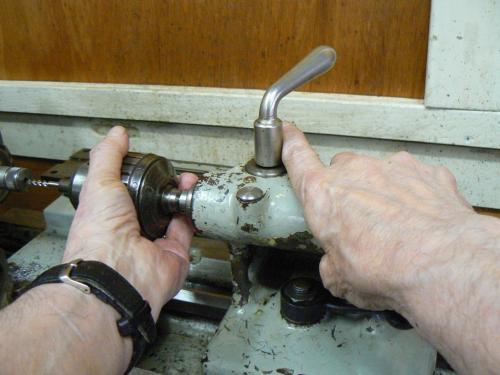 There is no need to be concerned about bottoming the tap because resistance to the process will be immediately detected by the operator’s left hand. The live chuck will spin as shown below, because the left hand holding the chuck has served as a very effective clutch.
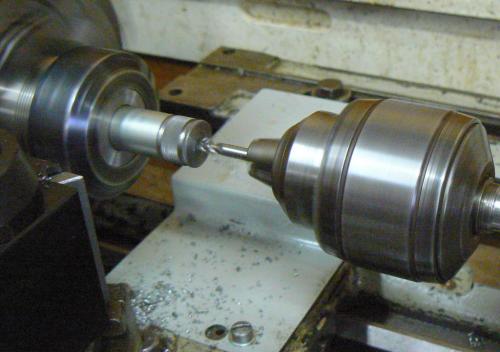 The live chuck, slipping in the operator’s hand and freely rotating, will also prevent tap breakage from chip clogging. It is very simple to apply the right “clutch friction” depending on the tap size and it’s not something that must be learned. Intuition tells the operator how much of a grip needs to be applied as soon as the tap enters the work.
After the tap has bottomed, stop the lathe, reverse it and, holding the live chuck with the left, withdraw the tailstock with the right hand. Ten seconds from start to finish: Done.
In the above photos, I violated a safety rule for lathe work by wearing a wrist watch.
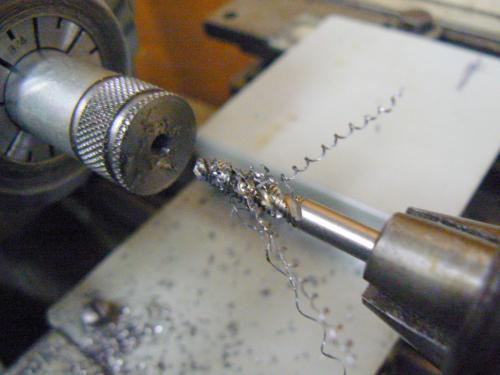 I use the technique routinely and effortlessly for taps from No. 4 to ¼ inch in my two lathes. I have little need for sizes larger than that so I can’t say if the friction required to grip the live chuck would be uncomfortable. But then, tap breakage is not common for taps larger than ¼.
Note that this method may not be particularly useful for machinery that cannot reverse spindle directions. This suggests that 3-phase motors, single phase machines with shaded pole (reversible) motors or some form of mechanical spindle reversal are suggested.
Cheers !
Posts: 3,002
Threads: 51
Joined: Apr 2012
Location: Ontario
I bought a 6 inch 3 jaw chuck version. They're great for handling pipe. You could grind out the weld and fit a plug to use a centre but the chuck is so much more convenient.
![[Image: QsURLrqRpkpluPFhfPH_wPpLQBHzMBfdWphbSGlX...2-h1276-no]](https://lh3.googleusercontent.com/QsURLrqRpkpluPFhfPH_wPpLQBHzMBfdWphbSGlXJw-yVhaIR7tktmp6929Zt7K-A_XDtnK8pLncbKeoHRV3LbxN1dVQEEgiH_mxSE3TNmcewlAisWrbH0eIVt4ZbFF6jFF45jIWOgliIQ7MPKjVI54efIpL-i3QHR5PFz5OVDENlHtoLeiSCYsbtGn911613Bs7OtLRLPKgy9yzF_3W7isMuRDb_sCQtgiasuHABdIKk3lRmYf8EZXzIweKygCsHSDZbY-XPDjENe1-7ePCSgN0gPMr0QDb_kdZ0QbikeYhuQfoZtON7EFziR8uMJ7GHOBUtLCEjllaW2PQqpiXZgNSEkxmw1JKCiHJ1cf2vo4p7O0xXq3tnxHaidUZvzz5e4XhfKgQg4FecdSsRoo980RBCRhQcgdliwCPk9o1tgUbFpZ1QieVwECcySzIIHwcn8zB7sCtzVUvBIVNqQZAs3TbABmKof9EGoCsBwBfwRrwaIgd-x1VnEzUWBGkuaC3bFuBPzdk51tv76_6VABa0ee0JcEHKo2vVDgwMCr_od-nE0QCFzilVc3u_AnSbHGWqxgsjI5LLxECZkHVYj4JbIzM4ZfJoS0k5TqXI2NI5FwcJ7XVg0jd=w1702-h1276-no)
And you can use it as a drill chuck.
![[Image: 9oy4HlPtiZRMcQ5gSia05D6CbLxInlxuba2VUe3X...2-h1276-no]](https://lh3.googleusercontent.com/9oy4HlPtiZRMcQ5gSia05D6CbLxInlxuba2VUe3XIxvkKfF1xWhYsfoq5vwKnwWmPfOEIGFyvWTwKNiAQlKRzTkxTvGJD3aiqEcPDxXCNykzZ91UgL9nc8afw9azAE61Iwn-1OvFgYo2GZjjkLu2ucddMeGmy7KZSxC37f_1vhQkK9ZqShyVQ6aFV4vEIehTVceFZiSZZQD6RviDjJ3B8YvurQYdVkEOWjuymn3FmokGYic-ZNCCdNZ0YAEPdVS660gFpQJLfWRrwr9VUbDTg7tA84TufJTygN071rHm9ZYLnZ5AKyt6XGW41ojRp8ae9GCK-9wbfC-G4zCCDv11XtKeMKpqSKRTdcRcr-8DxXd3V2gpZXQk6mU4WO4vkhQ3umlOqRAmUV1M_aEuuP93ugBCyLoqQOoqbxq7V59_PmNGzVwpwZsKhBwNAPKgwMQHIgbYbbJlN04RPJfFHNLT1Ws9eogAVuRgi62uaQ_5WufIGqT6NnBqOyQRzHlwcupyKW2VB-as9hdK2n39wrdXz21SOm-ddVAlAc6s__FKBFeSAPWC9Ht3UmClaqsDU0Gjs6A7bHzDs9p6YQrhLMX44S5cKPo3gIe82Yn0VIfecMF2Imx1KqYk=w1702-h1276-no)
I was making morse taper mandrels to cut gears with the dividing head, I had the MT adaptor for the drill chuck in the spindle holding the mandrel. This worked.
![[Image: 949JE3xOLPxD5adbauEjANas_IM7te3JFHGu4Ym2...2-h1276-no]](https://lh3.googleusercontent.com/949JE3xOLPxD5adbauEjANas_IM7te3JFHGu4Ym2MeUNyLBJeDwppdR2oocuz1s5pUGYBPGKbLC4YgmDGdE1EDtEaKtnhRlMKKL-OKVRMB-ev_6isiHl73WfIyv7UTUHRBzCKUql_AVx0nYFsxNjlPynZRQ2qQ1VzTlFI9X3hPR-GaeY0RcAobB-Ik5Tdb_udTfGXyM9SMEprV4iEOGHiEwivOkbzS_0XM1M5xT1QMjtjKP3YbuDAJngFzLXb59i1z5iY3cgRE2Oh_iom0SfjkvpfBPSKeRgzdkRw-coZcjFfgfkbJM6sYZgU8tl3SwDdHTOP3Y4EbFHfHvOoCQ-6W0e6aIXPkaN0v4a9CfzrKeG0Xz9QosN1C1Bmo5lWJIriH8l4DDiKuhmZ-Wkgkv-7oimFB9cvOVAfUbBz-J57DDQVqd2vHfezlVCL-uVcUkJeciFvMoMtNfxlce5YfcvUe7U46oIX1PPIhdmYdUbyfRUTkknvfuApZbAWgynGOc98I7GStlCxh0c_o0STpxVIFO_wOZ7grdihLqctmaS0GuvwYBn0jucMv5XX3YgOhVF45ErvbD7DrUDHPi5u1IQdlhZwFtnbV8z5_RwMHAhWQos3NOF_xI8=w1702-h1276-no)
Free advice is worth exactly what you payed for it.
Greg
Posts: 215
Threads: 22
Joined: Jul 2017
Location: Eureka, CA, USA
(09-05-2017, 09:29 PM)f350ca Wrote: I was making morse taper mandrels to cut gears with the dividing head, I had the MT adaptor for the drill chuck in the spindle holding the mandrel. This worked.
![[Image: 949JE3xOLPxD5adbauEjANas_IM7te3JFHGu4Ym2...2-h1276-no]](https://lh3.googleusercontent.com/949JE3xOLPxD5adbauEjANas_IM7te3JFHGu4Ym2MeUNyLBJeDwppdR2oocuz1s5pUGYBPGKbLC4YgmDGdE1EDtEaKtnhRlMKKL-OKVRMB-ev_6isiHl73WfIyv7UTUHRBzCKUql_AVx0nYFsxNjlPynZRQ2qQ1VzTlFI9X3hPR-GaeY0RcAobB-Ik5Tdb_udTfGXyM9SMEprV4iEOGHiEwivOkbzS_0XM1M5xT1QMjtjKP3YbuDAJngFzLXb59i1z5iY3cgRE2Oh_iom0SfjkvpfBPSKeRgzdkRw-coZcjFfgfkbJM6sYZgU8tl3SwDdHTOP3Y4EbFHfHvOoCQ-6W0e6aIXPkaN0v4a9CfzrKeG0Xz9QosN1C1Bmo5lWJIriH8l4DDiKuhmZ-Wkgkv-7oimFB9cvOVAfUbBz-J57DDQVqd2vHfezlVCL-uVcUkJeciFvMoMtNfxlce5YfcvUe7U46oIX1PPIhdmYdUbyfRUTkknvfuApZbAWgynGOc98I7GStlCxh0c_o0STpxVIFO_wOZ7grdihLqctmaS0GuvwYBn0jucMv5XX3YgOhVF45ErvbD7DrUDHPi5u1IQdlhZwFtnbV8z5_RwMHAhWQos3NOF_xI8=w1702-h1276-no)
Greg, your work is always ingenious and well-crafted but I don't get the above operation (one glass of wine too many before dinner ?). If/when convenient, could you explain how the live chuck is involved here ?
Many thanks !
Posts: 3,002
Threads: 51
Joined: Apr 2012
Location: Ontario
Don't feel bad Randy, I often have to explain things twice when Im talking to my self.
I had the MT 5-2 adaptor in the headstock to hold the mandrels I was making, thats the bushing I need in the tailstock for my drill chucks, but needed to drill the end for the captive bolt. The live chuck was the only thing I could come up with to hold a drill. Worked great to hold the tap too, but probably spun it by hand, the inertia of the chuck would break a small tap before it ever got to spin.
Your version of the live centre is now on my list of things to make.
Free advice is worth exactly what you payed for it.
Greg
|


