Posts: 642
Threads: 14
Joined: Oct 2013
Location: East Sussex, UK
Re-tagged the Ewes that had lost their ear tags, marked up the slaughter lambs, tagged and marked the breeding lambs, and separated out the adult rams to prevent early 'accidents' . So not much got done in the workshop 
Andrew Mawson, proud to be a member of MetalworkingFun Forum since Oct 2013.
Posts: 2,344
Threads: 53
Joined: Feb 2012
Location: Spencer MA USA
The following 3 users Like PixMan's post:
EdK (08-24-2014), Mayhem (08-24-2014), jroadman (09-01-2014)
About 4 hours in the shop today, wish I had more time to finish this! This is the third attempt at making a feed trip bracket for Darren. First one I screwed up on thickness of the blank, didn't realize it was too thin until I'd gotten to this step. Second one came out right to the OEM print (other than some mom-essential casting features I couldn't replicate with 2-axis machining), too bad the print was WRONG as compared to the actual part. Couldn't be savd my altering it.
So the other day I squared up the block of "mystery steel", though I am petty certain it's 4140 annealed plate. Today, I did on the operations on the first side, but not without a casualty. In taking a very heavy cut with a 1/2" 3-flute solid carbide end mill, the cutter slipped in the R8 collet and dug into my new Kurt hardened vise jaw. Oh well, stuff happens.
Today I finished Op #1. I did have a scare though, because after drilling the holes I mounted my 3" boring head and started a cut to finish the Ø14mm bore. Uh oh, either the drill hole is off center or the boring head. I pulled out my Interapid indicator and checked the Ø43mm boss, it seems my DRO/Protorak control somehow skipped and lost the X axis position by .028"! Just barely enough to finish the bore. Not happy with the chatter in the bore, but it'll work fine. As compared to the worn out original part (which I now have for comparison), it's tighter on my home shop make gauge pin.
![[Image: IMG_2409-r_zpsed4c4f20.jpg]](http://img.photobucket.com/albums/v466/kenm10759/Dads%20shop/IMG_2409-r_zpsed4c4f20.jpg)
![[Image: IMG_2415-r_zpsf763eabe.jpg]](http://img.photobucket.com/albums/v466/kenm10759/Dads%20shop/IMG_2415-r_zpsf763eabe.jpg)
I've got three more setups to finish it. First, flip it over and finish the counterbores for the M6 mounting screws. Mill the top profile, finish mill the Ø38mm spotface, add the 10mm wide access notch and add a number of radii to make it look good. Second, stand it up on its side and complete the Ø16mm bore through. Last, stand it on it's round head and add the 6mm wide slot for the actuation lever.
Wish me luck!
Posts: 8,741
Threads: 313
Joined: Feb 2012
Location: Arizona/Minnesota
Good luck Ken! 
Ed
Posts: 4,683
Threads: 93
Joined: Feb 2012
Location: Perth, Australia
Oohhh - shiny  . Looking good Ken and I know it is your skill and experience that will see this project to completion, so there is no need for luck.
Hunting American dentists since 2015.
Posts: 2,344
Threads: 53
Joined: Feb 2012
Location: Spencer MA USA
Thanks Ed & Darren!
I appreciate the comments. I don't know if I can get to finishing it during the week but I'm going to try and find time to do so. It's got another 4 to 6 hours of work left in it, and I'll need to find a Ø5mm reamer so I can ship it COMPLETED this time. I want to see it just bolted in with no fussing around nor finishing operations...other than some paint.
Posts: 4,683
Threads: 93
Joined: Feb 2012
Location: Perth, Australia
There is no rush Ken, as I have several other projects on the go.
Hunting American dentists since 2015.
Posts: 4,513
Threads: 139
Joined: Feb 2012
Location: Kempton Park. South Africa
Nice milling work Ken. 

DaveH
Posts: 2,344
Threads: 53
Joined: Feb 2012
Location: Spencer MA USA
(08-24-2014, 07:43 PM)Mayhem Wrote: There is no rush Ken, as I have several other projects on the go.
Thanks Darren. I do want it done as soon as possible because I want it in your hands long before you head this way in October. That way if we need to make Version 4.0 we'll be ready.
Posts: 4,683
Threads: 93
Joined: Feb 2012
Location: Perth, Australia
There will be no version 4! Positive thinking Ken...
Hunting American dentists since 2015.
Posts: 532
Threads: 39
Joined: Jan 2013
Location: Kelowna, BC, Canada
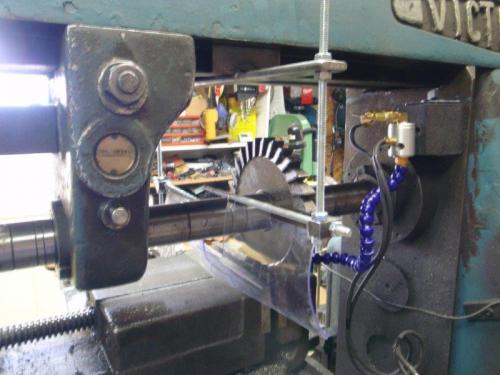
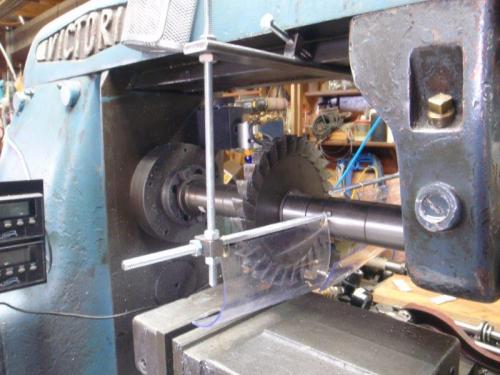
I started using my mist cooler yesterday. It uses an air jet to clear chips and adds a bit of coolant to the cutter. The air jet blows the chips a fair distance from the mill, so I made up an adjustable shield to attach to the Victoria.
The shield consists of a bar that clamps to the dovetail on the mill overarm, with two threaded rods running down from the ends. Horizontal rods hold two vinyl curtains coming in from both sides of the mill arbor.

Front view. The rods are easily adjusted by loosening the nuts.

The vinyl tends to curve when you cut small pieces of it. Another possibility is 1/16" polycarbonate. Since I will need several sizes of curtain for use with different size cutters, I'll try some of that next time.
Mike
If you can't get one, make one.
Hawkeye, proud to be a member of MetalworkingFun Forum since Jan 2013.
|


![[Image: IMG_2409-r_zpsed4c4f20.jpg]](http://img.photobucket.com/albums/v466/kenm10759/Dads%20shop/IMG_2409-r_zpsed4c4f20.jpg)
![[Image: IMG_2415-r_zpsf763eabe.jpg]](http://img.photobucket.com/albums/v466/kenm10759/Dads%20shop/IMG_2415-r_zpsf763eabe.jpg)

 . Looking good Ken and I know it is your skill and experience that will see this project to completion, so there is no need for luck.

