Posts: 642
Threads: 14
Joined: Oct 2013
Location: East Sussex, UK
The following 1 user Likes awemawson's post:
Highpower (01-09-2016)
My Brother 'P-Touch' labels used to curl after a few weeks, until I took to wiping the surface that they are to stick to with IPA - let it evaporate then stick the label on pressing firmly. Since I've done this the problem is solved !
Andrew Mawson, proud to be a member of MetalworkingFun Forum since Oct 2013.
Posts: 691
Threads: 14
Joined: Feb 2015
Location: Oakland, California
The following 1 user Likes Roadracer_Al's post:
rleete (01-11-2016)
Posts: 642
Threads: 14
Joined: Oct 2013
Location: East Sussex, UK
The following 2 users Like awemawson's post:
EdK (01-10-2016), rleete (01-11-2016)
Isopropal alcohol not India Pale Ale !
Andrew Mawson, proud to be a member of MetalworkingFun Forum since Oct 2013.
Posts: 4,683
Threads: 93
Joined: Feb 2012
Location: Perth, Australia
Hunting American dentists since 2015.
Posts: 205
Threads: 27
Joined: Jan 2013
Location: Maryland USA
The following 1 user Likes ieezitin's post:
Highpower (01-10-2016)
That close to the bull with I presume iron sights at 100m, anit bad in my book.... well done.
Anthony.
ieezitin, proud to be a member of MetalworkingFun Forum since Jan 2013.
Posts: 4,369
Threads: 178
Joined: Feb 2012
Location: Missouri, USA
(01-10-2016, 07:21 AM)ieezitin Wrote: That close to the bull with I presume iron sights at 100m, anit bad in my book.... well done.
Anthony.

Very respectable Darren! That would put you into an expert classification around here.
Now do that with the same iron sights at 200, 300 and 600yds and your shootin highpower! 
Anyhoo.... I think a lot of my issues with the labels peeling off have a lot to do with the temperature and humidity changes in my basement in the changing seasons. The little plastic drawers in those bench top storage racks are the worst for (me) in holding onto labels.
![[Image: Akro-Mils-Plastic-Storage-Drawers.jpg]](http://allthingsplastic.net/wp-content/uploads/2011/03/Akro-Mils-Plastic-Storage-Drawers.jpg)
Willie
Posts: 2,324
Threads: 271
Joined: Jun 2014
Location: La Libertad, Philippines
01-10-2016, 07:24 PM
(This post was last modified: 01-10-2016, 07:24 PM by Dr Stan.)
Very respectable Darren! That would put you into an expert classification around here.
Now do that with the same iron sights at 200, 300 and 600yds and your shootin highpower! 
BTW, 100 meters is just over 300 ft or 100 yards. I call that damn good shooting with iron sights.
Posts: 2,596
Threads: 99
Joined: Dec 2014
Location: Michigan
Well not today, but I finally finished it today. It's been mostly make a bit of progress, have to order something, wait..., make a bit more progress, have to order something else, wait..., and so on. You know the drill.
Anyway, the surface grinder came with a mount for a lamp, but no lamp. I had some goose necks from a floor lamp my daughter's friend gave me. The stand wouldn't stay together - the threads stripped. Who threads thin tubing and expects it to hold and not strip? Yeah, I know, the Chinese. Anyway, I grabbed one of the five goose necks and the metal part of the lamp and went from there.
First was to make an adapter to go from the goose neck to the holder. That Thread Detective came in handy there to identify an M10-1.0 thread so I turned a piece of 1/2" aluminum bar, drilled thru, drilled and tapped one end for the goose neck to go into and cut a groove in the other side for a circlip to hold it in the holder. You can see most of it here in the finished product pic.
![[Image: lamp3.jpg]](http://metalshop.nobucks.net/pix/lamp3.jpg)
I got the LED for the lamp off of ebay, they're meant for home lighting and run on 12V AC or DC. One will light a room and it only draws 140ma (not the spec, I measured it). Back to the project...
So I have it all wired up but need a lens. The "Water Clear Plastic" resin I have is old so the lens came out a bit on the yellow side and was thick enuf to trap some air bubbles, but for this purpose both were acceptable. Being out of mold material I had to improvise and used the bottom of a can of WD40 for the mold. Last nite after it came out of the mold it went into the curing oven and finished its cure and this morning I chucked it up and cut the groove for the metal cup that holds the electronics. Since you couldn't really see anything I didn't take a pic of it, but the next step was to turn down the diameter a bit. So in the pic below, I have it chucked up between two Rubber Chuckys to trim it down some.
![[Image: lamp1.jpg]](http://metalshop.nobucks.net/pix/lamp1.jpg)
Next is to attach the lens to the lamp. I used some of that UV glue for it. I found some better stuff than what they advertise on TV. Look for Rapid Fix on ebay.
![[Image: lamp2.jpg]](http://metalshop.nobucks.net/pix/lamp2.jpg)
Got it all attached to the grinder, shut off the overhead lighting and turned it on. I'd say that's sufficient light, although I may rotate the holder 120 degrees to give some more versatility to it.
![[Image: lamp4.jpg]](http://metalshop.nobucks.net/pix/lamp4.jpg)
That's all folks!!
Posts: 4,369
Threads: 178
Joined: Feb 2012
Location: Missouri, USA
The following 5 users Like Highpower's post:
Mayhem (01-12-2016), EdK (01-12-2016), TomG (01-12-2016), f350ca (01-12-2016), DaveH (01-14-2016)
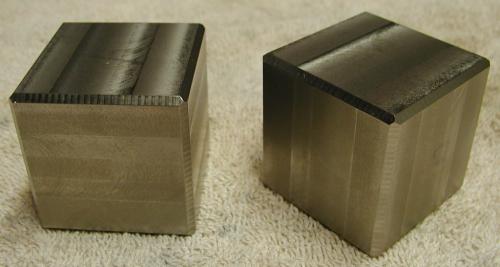
Spent some time working on some precision paperweights. Something that is meant to be handled. 
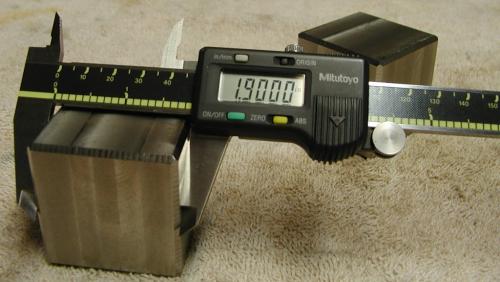
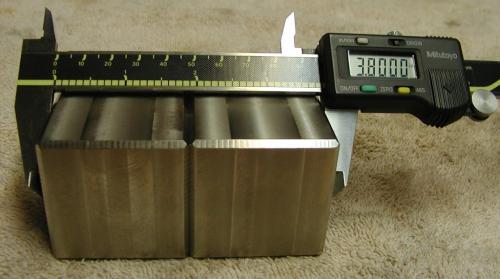
2 inch stainless steel square bar (303) machined into 1.900" flat and square cubes. Deadly sharp edges that you could shave with so I chamfered all of them today. So now I'm left with 8 deadly sharp points in all the corners that you could cut glass with... 


"This life is hard, and it's harder if you are stupid."
Don't I know it.... 
These were supposed to be a couple of "Turners Cubes" by now, but it's taken me a week already trying to figure out the math and then trying to figure out how to draw 3 simple squares and a handful of circles using CAD software. (DraftSite) 
I know it looks like fido's butt, but I'm surprised I've made it this far on my own. Of course it's probably all wrong, but at least I'm trying. 
 Disaster.pdf
 (Size: 6.45 KB / Downloads: 26)
Willie
Posts: 4,683
Threads: 93
Joined: Feb 2012
Location: Perth, Australia
(01-08-2016, 03:18 AM)Mayhem Wrote: ...
The three spare holes are there in case I get any additional size/form taps. I just hope I don't need to buy four 
Famous last words. I just found a box with a bunch of small taps in it (#4, #6, #10, #12 etc) 
I think I may be able to find a small storage box that will hold these and sit on top of the vials. Either that of I put the spiral point taps in with the normal hand taps, rather than segregate them like I have...
Hunting American dentists since 2015.
|


![[Image: Akro-Mils-Plastic-Storage-Drawers.jpg]](http://allthingsplastic.net/wp-content/uploads/2011/03/Akro-Mils-Plastic-Storage-Drawers.jpg)

![[Image: lamp3.jpg]](http://metalshop.nobucks.net/pix/lamp3.jpg)
![[Image: lamp1.jpg]](http://metalshop.nobucks.net/pix/lamp1.jpg)
![[Image: lamp2.jpg]](http://metalshop.nobucks.net/pix/lamp2.jpg)
![[Image: lamp4.jpg]](http://metalshop.nobucks.net/pix/lamp4.jpg)


